
Summary
This article offers some basic steps for setting up a new Apple computer. It’s written for the beginner, but an advanced user can quickly skim the points emphasized in bold. This is the general process that a support technician would go through when setting up a new Apple computer.
Glossary
For those new to Apple computers, this glossary provides an introduction to some common terms that will be used in the instructions below.
- Dock. The Dock is a row of icons that spans the bottom edge of your screen. It can be customized to show up on the left or right edge of the screen. It can also be customized to hide when not being used. The Dock is where you can place icons to commonly used programs, files, or folders.
- Finder. The Finder is a system browsing tool that lets you explore your files on your computer. It’s similar to Windows Explorer. To access it, click on the face icon in the lower left on the Dock. You are “in the finder” if a menu across the top left of the screen shows Finder, File, Edit, View, Go, Window, and Help as shown below. This can appear when no programs are running and no windows are open. In addition to being “in the finder” you can also have the Finder browser window open when you exploring folder and devices as shown (partially) below. When you click an item on the left, its contents show on the right.

Startup Installation Media
If you’re working with a brand-new computer, then skip to the next section below. However, if you’re reinstalling the operating system, perhaps after installing a new hard drive, or recovering after some other malfunction, then you’ll need the original system media. If you’ve lost the original system discs, you could try these steps:
- Internet Recovery. If you have a newer Apple computer (one that came with OS X Lion or later) you can hold down Command-R during startup to use Internet Recovery. This will restore your computer from the Internet (and skip steps #2 and #3 below). If your Apple computer cam with OS X Snow Leopard or earlier, then you’ll need startup media (described in step #2).
- Mountain Lion OS X 10.8 Disc. Find someone who has a startup system DVD for Mountain Lion. Put the disc in the drive as you’re turning on the computer while holding down the “C” on the keyboard. This will start to the CD drive media.
- Mavericks. Once you’ve installed Mountain Lion, you can go to the App Store and install Mavericks. You’ll need an Apple ID to login to the store, but no payment will be required.
Apple iLife and iWork Software
New Apple computers come with the full suite of iLife and iWork software. The iLife suite includes iMovie, iPhoto, and GarageBand. The iWord suite includes Keynote, Numbers, and Pages. If you installed the operating system from the original discs that came with your computer, any software that came with the computer should be installed again. However, if you recovered the computer using standard OS installation media, then you’ll need to install these software programs separately. If you previously purchased them from the App store, they can be downloaded and installed again for free from the App store. However, if they originally came with your computer and now you’ve lost your originally installation discs, then you’ll need to purchase these from the App store.
Initial Startup User Settings
When you first turn on the computer (or during the installation procedure), you’ll be asked to choose a standard language, provide a profile picture, and enter your Apple ID. The Apple ID is used as a single authentication login for purchases and iCloud data. However, you may want to keep separate accounts for these as explained below.
Import From Backup or Computer
At some point you may be asked if you’d like to import from another Apple computer or TimeMachine backup. If you’ve purchased a new computer to replace an existing computer that is still working, then you can transfer your programs, settings, and data from the old computer to the new one. This can also be done using a TimeMachine backup.
You can import during the initial startup (or rebuild) of a new computer or you can also wait until later and choose the Migration Assistant (found in Utilities). It’s better to wait until later.
It’s likely that the computer you’re importing from has all of the latest updates. A new computer out of the box will require updates before an import can be performed. In fact, this is probably the message you’ll receive if you attempt to migrate.
Make sure the old computer and new computer have any available updates installed.
Apple ID and iCloud User Accounts
It’s best to maintain separate iCloud and Apple ID user accounts. Your iCloud data is personal and unique to you (calendar, contacts, email, tasks, reminders). The Apple ID is used for purchases of hardware, software programs, apps, music, movies, and other products or services. It’s likely that you’ll want to share these purchases across multiple computers. For example, a family could have several computers all authenticated to the App Store for shared software. However, those same computers might be configured for different iCloud user accounts. In fact, a single computer may have one Apple ID used for software purchases, but several user login accounts that offer each person their own synchronized iCloud data.
Apple Mac Computer Basic User Settings
The following instructions offer some suggested user settings for a new Apple computer. These will help you navigate the computer better.
- Hard Drive Icon. By default, the hard drive icon is not visible on the desktop or in the finder viewer. External disks as well as CDs, DVDs, and iPods are not displayed either. Many users would prefer to see these devices. To enable these, from the Finder menu, choose Preferences, then select the devices you’d like to have visible on the desktop.
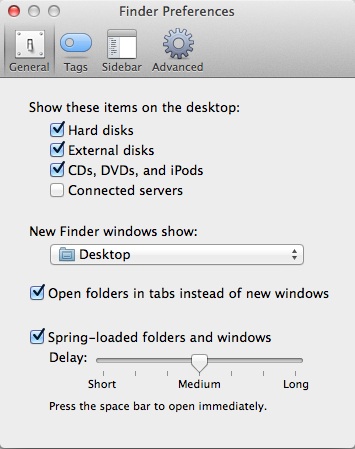
- New Finder Windows Show. By default, when you open a new Finder window, you’ll see the All My Files listing of files. This is a categorized listing of all your files. However, most people are either working with recent files on their desktop or in specific project folders within their Documents folder. To change what folder or location is showing when opening the Finder, go to Finder Preferences and choose Desktop (for example) under the New Finder windows show option. This is shown above.
- Show Hard Drive in Finder Window. By default, the hard drive doesn’t show in the Finder browser. You can click and drag it from the desktop into an open Finder window under the Sidebar heading Favorites as shown below. The blue line appears to show where the drive will be listed. Other files, folders, and devices can be placed in the Favorites area of the sidebar. This is identical to the Windows Explorer.

- Show Applications Folder in Dock. By default, the Applications folder isn’t readily available. So, to run a program, it’s necessary to find it first. It’s much easier to have the Applications folder in the dock. From the Finder browser, click on the Macintosh HD or whatever your hard drive name is. Click and drag the Applications folder to the Dock to the right of the faint divider bar. Then lift up on the mouse button. Click the image below for a larger view.

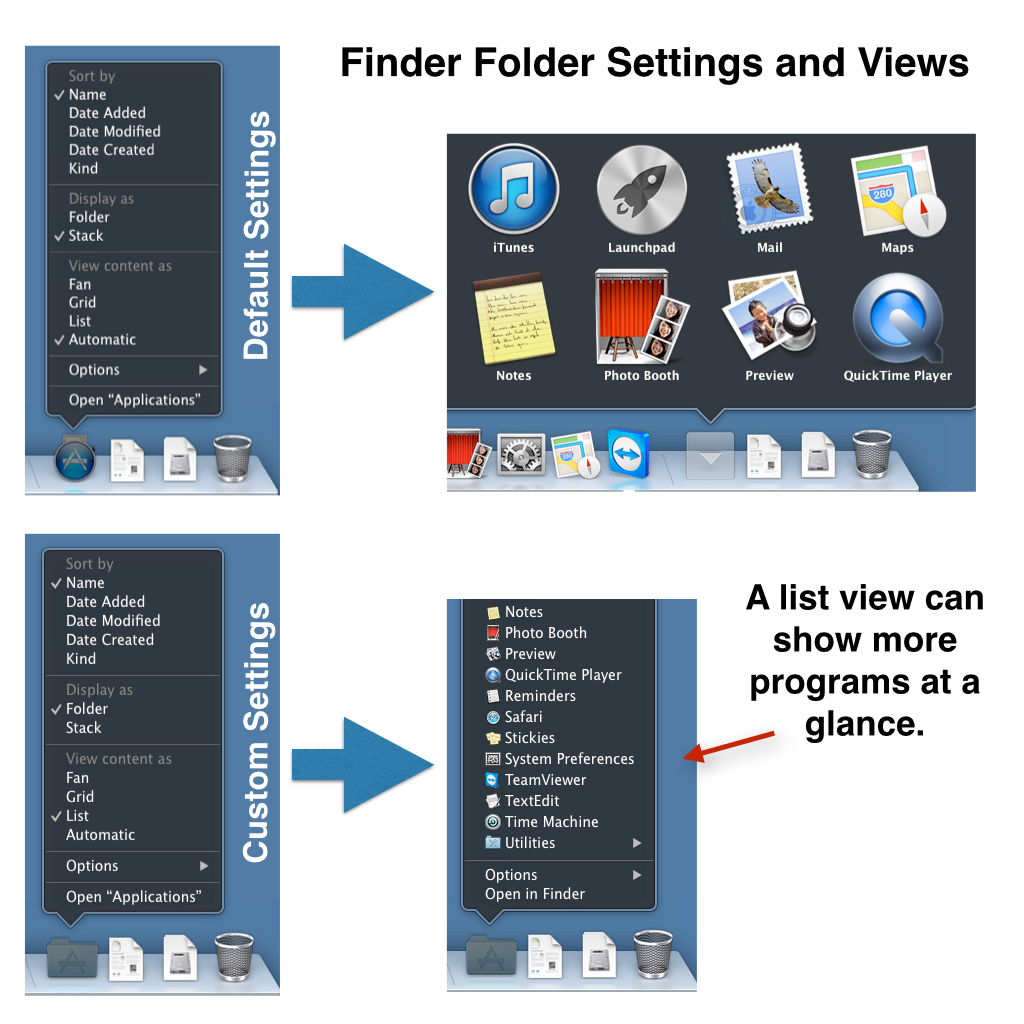
- Applications List View. By default, the Applications listing will be a Grid view as shown below. If you switch to Display as Folder and View content as List, it will be possible to see more programs at a glance and easily scroll through them. These settings and the results can be seen below. Click the image for a larger view.
- Show Documents Folder in Dock. For many people, the documents folder is a frequently accessed folder. If this is true for you, or if there’s another folder you need access to regularly, use the Finder browser to locate that folder in the hard drive and then drag it to the Dock just as you did with the Applications folder. Also set that folder to Display as Folder and View content as List.
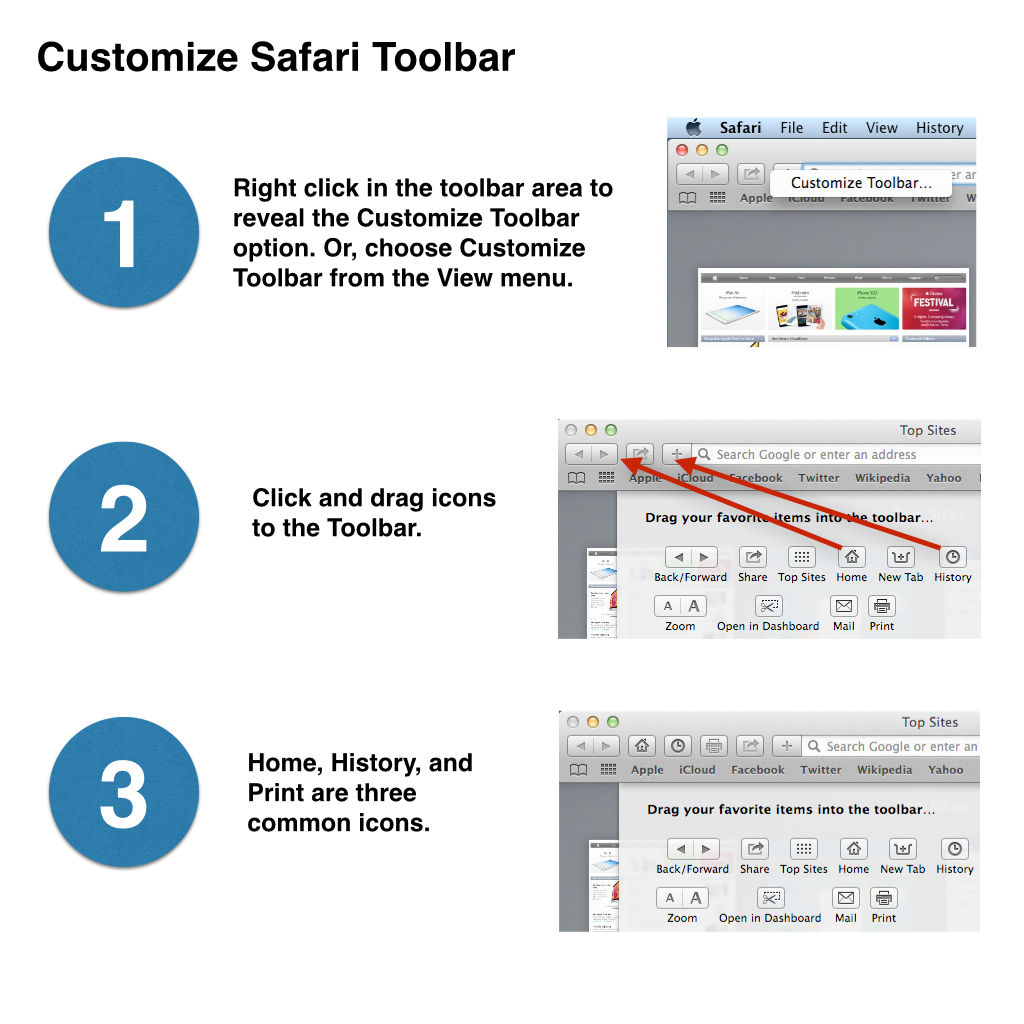
- Safari Customize Toolbar. By default, the Safari Toolbar won’t display a History icon. Right click next to the website address display and choose Customize Toolbar as shown below. Then, click and drag the desired shortcut icons to the toolbar as shown below. Click the image for a larger view.

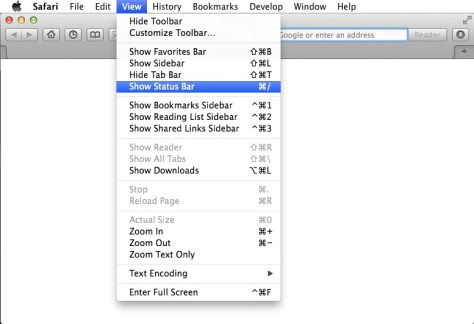
- Safari Status Bar. There are times when it’s helpful to know a link URL address (the website address of a hyperlink) without clicking on it and opening the page. The Status bar at the bottom of the Safari browser window makes this possible. Choose Show Status Bar from the View menu (as shown below).
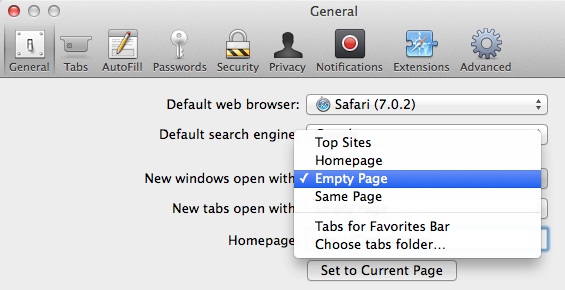
- Safari Home Page and Start Page. Safari has three settings that relate to start pages. You can set the home page (the page you go to when you click the home icon). You can define the page displayed when you open a new window. You can also set the page displayed when you open a new tab. Google is a common setting for all of these since often people perform a search when they go to web.

Another possible setting for these options is to choose blank page.


Basic Apple Computer Software
These are some basic operational programs that should be installed on an Apple computer.
- TeamViewer. It can take many hours to setup a computer, and much of that time is spent waiting for updates and installations. For this reason, it’s helpful to setup computers remotely; checking in throughout the day to continue with the process. TeamViewer is a free program that lets you access computers remotely.
- Adobe Reader. Apple computers come with the Preview utility and the ability to view a wide array of program files even if you don’t own the software used to create those files. However, it’s helpful to have Adobe Reader for additional features when viewing PDF files.
- Adobe Flash. Many websites require Adobe Flash to display much of their content.
- Microsoft Silverlight. Many Microsoft websites use Microsoft Silverlight. Like Adobe Flash, it’s a platform for development of website animation and other features.
- Flip4Mac. Apple computers don’t natively have the ability to play Windows Media Video (WMV) video files.
- Mozilla Firefox. Some websites are best viewed using a specific browser such as Mozilla Firefox or Google Chrome. So, it’s a good idea to install these.
- Google Chrome. Some websites are best viewed using a specific browser such as Mozilla Firefox or Google Chrome. So, it’s a good idea to install these.
- LibreOffice. Libre Office is a free alternative to Microsoft Office.
- Microsoft Office 365. At a cost of $100 per year, you can have the full Microsoft Office suite for use on up to five computers (Mac or Windows). This isn’t required, but may be necessary if you absolutely need to use Microsoft Office software products.
