iPhone iOS 8 Contacts Search Results Display Error

When performing a search of your contacts on the iPhone using iOS 8, you may notice that the name at the bottom of the list can’t be seen or selected if the search results fill more than a screen. The last contact in the results will be hidden below the viewable area on the screen.

You can move the search results page up (by pushing it up), but it snaps back again and the last name on the list again returns below the viewable screen area.

In the example below, a search for “wireless” in contacts produces many results. The last few results at the bottom of the list are shown.

By pressing up on the list (scrolling down), the hidden result shows.

The only work-around for this at present would be to create a contact entry that will show up at the very bottom alphabetically for the search result.

Click the image below to enlarge.

20141102su-apple-iphone-search-results-scroll-display-error-1024x768

Do Not Allow Automatic Apple Updates

Apple computers running the latest versions of the OS X operating systems, such as Mavericks (10.9) or Yosemite (10.10) will be notified when system updates and software updates are available in the App store, as shown  below.

20141028tu-apple-osx-yosemite-automatic-updates

If you click on the “Later” option, you’ll be given an option to be reminded later, or to have updates installed automatically. It’s okay to choose the ‘remind me later’ options, but it’s not a good idea to choose automatic installation of update because occasionally there are updates that will cause problems for your computer. Below is an example where a software supplier is telling users not to install the available update since it’s known to have a bug. Click the image for a larger view.

20141028tu-apple-osx-yosemite-automatic-updates-dont-update-yet

If automatic updates were turned on, this update would be installed and the software would not work properly.

A day later, the app developer released a new working version of their software. Click the image for a larger view.

20141029we-pdfscanner-apple-mac-app

Those without the automatic updates feature turned on were able to continue doing their work, skipping the defective update, and then getting the correct update when it was released.

Evernote – Unexpected Error Occurred While Synchronizing

While synchronizing Everynote, you may get an error message that states:

“An unexpected error occurred while synchronizing with the Evernote service. The cause is listed below. Check to make sure your computer and network are operating properly. To resolve this error consider exporting any unsynchronized notes then permanently delete the problematic items from Evernote. If the problem persists select ‘Customer Support’ under the ‘Help’ menu.”

Below the message there will be an indication of the error(s). Click on the small triangle to the left of that message to see more details about the error. If there’s a specific item that is causing problems, look for that note and delete it.

It’s possible that you’ll search for the offending file and not find it. It may be impossible to find the file using the Evernote search feature, or by manually browsing all your notes. If the file had previously been deleted, and put in the trash, it will be in the Evernote trash can, so it’s ignored by search requests, yet still exists and still causes problems during the synchronization.

Below are screen shots showing this process.

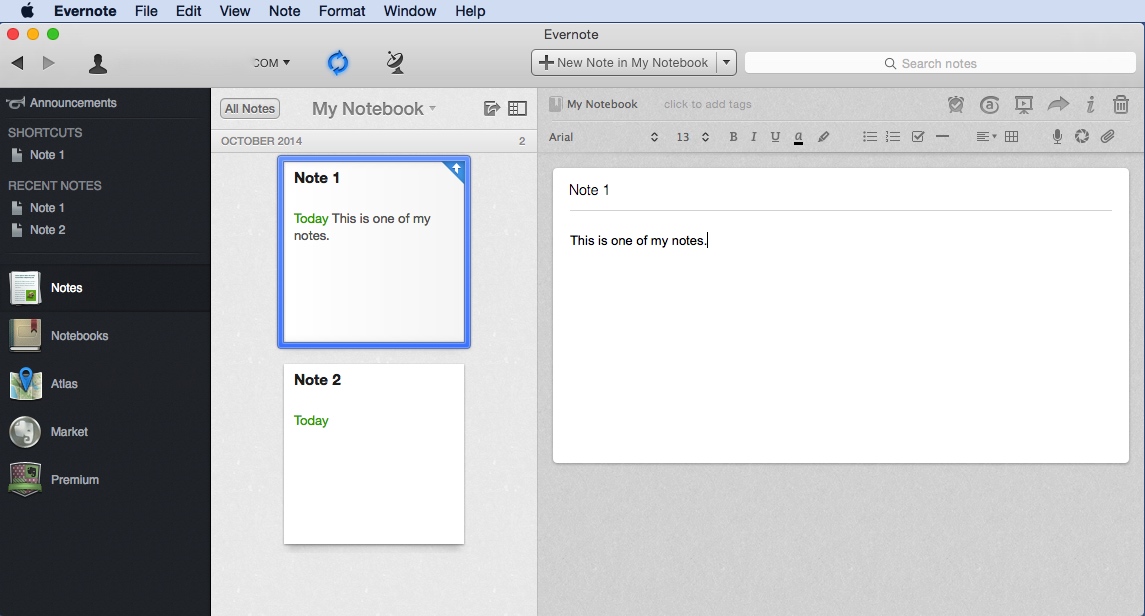
When synchronizing, the sync indicator should be blue and spinning. It is to the right of your username/email (the example here is blurred out). Click the image for a larger view.

20141026su-evernote-unexpected-error-occurred-while-synchronizing-with-evernote-service-could-not-synchoronize-note-001

If the synchronization fails, there will be a red icon with an exclamation point on top of the sync icon. Click the image for a larger view.

20141026su-evernote-unexpected-error-occurred-while-synchronizing-with-evernote-service-could-not-synchoronize-note-002

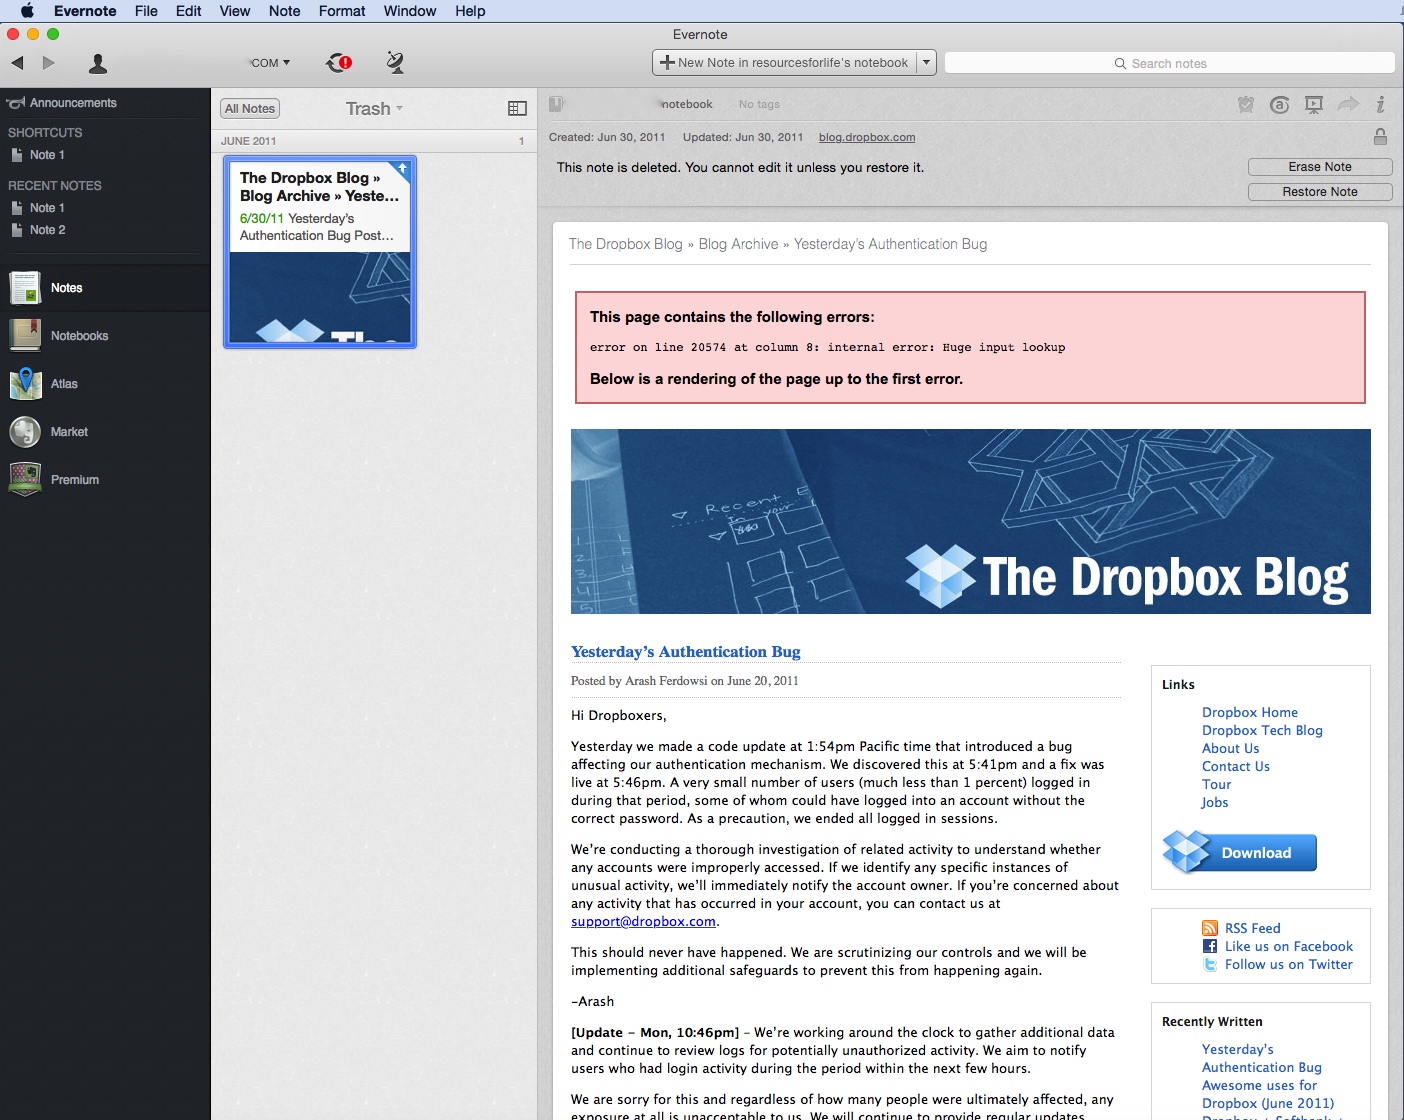
Click the error indicator to view the error details as shown in the example below. Click the image for a larger view.

20141026su-evernote-unexpected-error-occurred-while-synchronizing-with-evernote-service-could-not-synchoronize-note-003

In this example, performing a search on the word “Dropbox” yielded nothing. This is because Evernote doesn’t search the trash. Unfortunately, the error message doesn’t indicate the folder location for the offending note. So, unless you think to check the Evernote trash, you’ll be mystified by this error.

20141026su-evernote-unexpected-error-occurred-while-synchronizing-with-evernote-service-could-not-synchoronize-note-004

In this example, the item shown above from the Dropbox Blog has an error indicating, “error on line 20574 at column 8: internal error: Huge input lookup.”

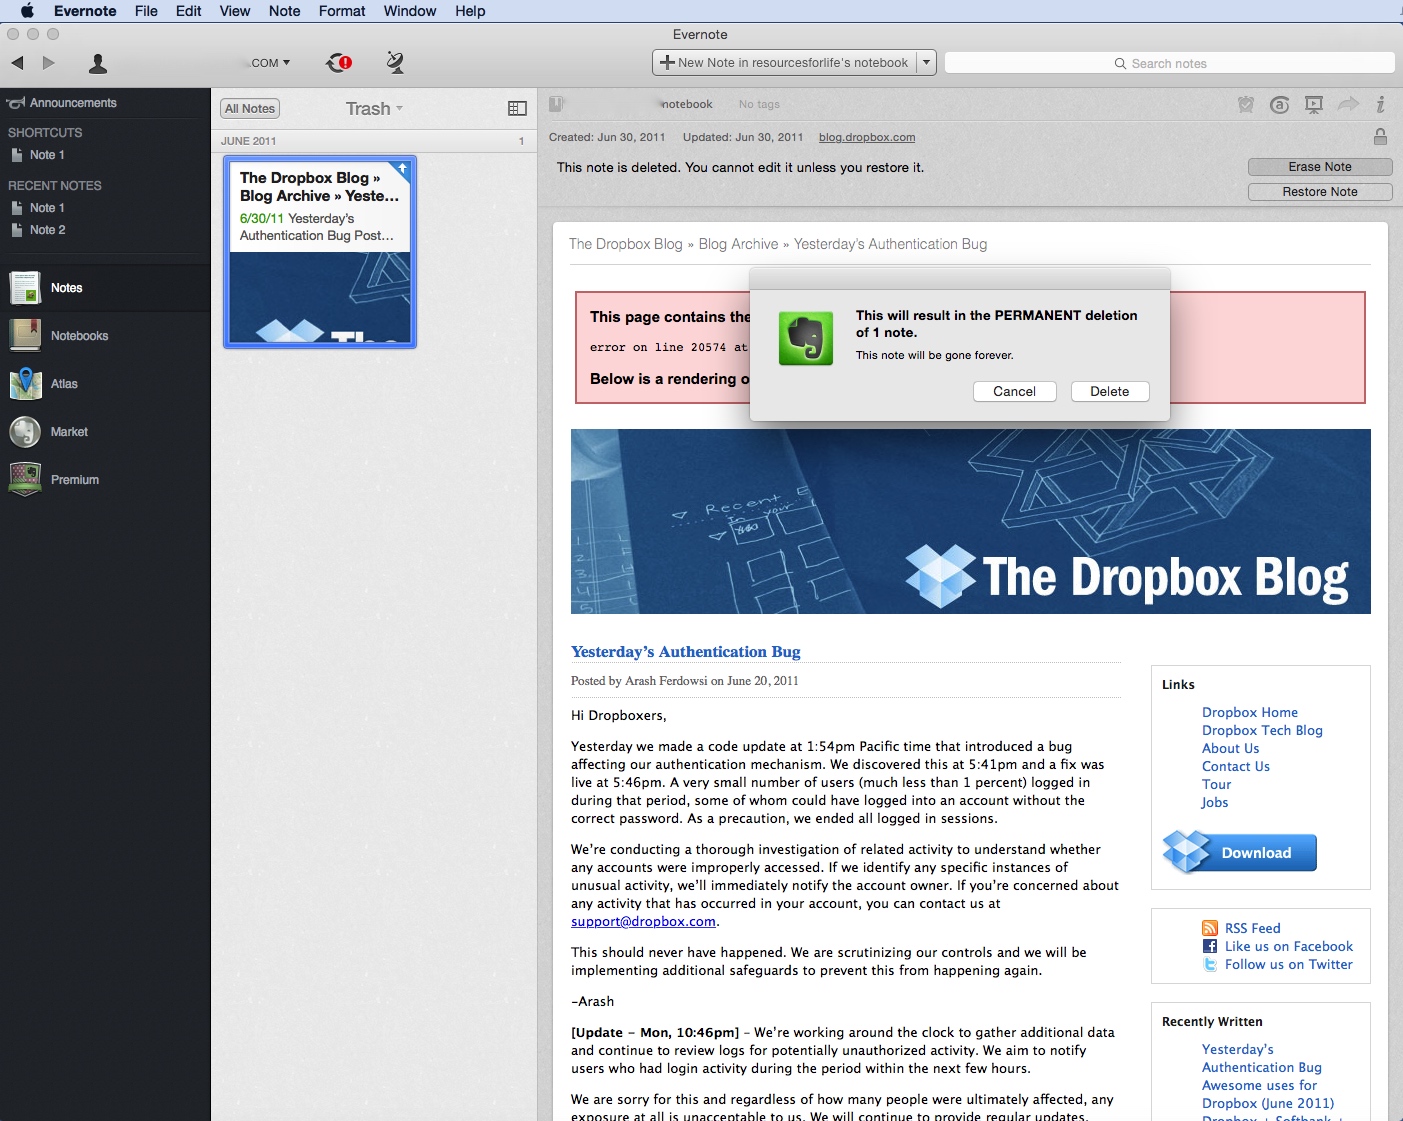
Once you delete this problematic note from the trash (by pressing the delete key), the synchronization process should work just fine.

20141026su-evernote-unexpected-error-occurred-while-synchronizing-with-evernote-service-could-not-synchoronize-note-005

Old Plex Servers Still Showing Up – Can’t Reach This Server

If you’ve deleted a Plex media server from your account, or rebuilt one with a different name, you may notice it is still showing up with a message stating: “We’re sorry, but we can’t reach this server.”

20141025sa-plex-server-not-found

This is probably due to cached website information in your browser.

Try using another browser and login to the Plex.tv website. You’ll likely not see the deleted servers anymore. If so, then clearing the cache and web files on your other browser should fix the problem.

Apple Yosemite Remove Icon from Dock

In previous versions of Apple OS X, users would mistakenly remove items from the dock when clicking on them.

As the icon would move up a smidgen, it would suddenly and without notice pull off the dock and “poof” disappear.

Attempts were made to correct this problem by having a delay before icons would be removed from the dock completely. However, this confused users who were intentionally trying to remove icons from the dock.

20141025sa-apple-osx-1010-yosemite-remove-icons-from-dockFinally in OS X 10.10 Yosemite, Apple has included a label that appears for icons being moved off the dock.

After a short period of time, the word Remove will appear above the icon to indicate it will be removed if not returned to the dock (before letting go of the mouse button).

This is helpful for people who might be organizing their dock icons.

Apple Computer IP Address Fixed IP Stuck Reset to DHCP

Problem Summary

If you have an Apple Airport wireless router, and at some point you set a fixed IP address for your Apple computer under the Network Settings > Ethernet > Advanced > TCP/IP > Configure iPv4 dropdown menu (Manual) and then later return the setting to Using DHCP, the Ethernet port on your computer might stop working properly, and the computer may continue to request the fixed IP address even though you’ve set it to DHCP.

Problem Solution

Follow these instructions to fix the problem:

  1. Begin by setting your computer Ethernet to use DHCP. This is found under under the Apple Menu > System Preferences > Network Settings > Ethernet > Advanced > TCP/IP > Configure iPv4 dropdown menu. Choose DHCP and save/apply.
  2. Run the Airport Utility (found under Applications > Utilities).
  3. Your Airport router should show up. Left click once on the icon to display the settings and then click on Edit.
  4. Click on the Network menu option.
  5. Click the Plus symbol below the DHCP Reservations list.
  6. Enter a Description (your computer name).
  7. Select Reserved Address By using MAC Address.
  8. Enter your Ethernet MAC address. It is found by going to Apple Menu > System Preferences > Network > Ethernet > Advanced > Hardware. Copy (highlight/select) the number/letter sequence displayed next to MAC Address and paste that into the entry for MAC Address in the Airport Utility.
  9. Enter an IPv4 Address such as 10.0.1.50.
    • This will cause the Airport router to override any previous setting that was requested by your computer or device.
    • It’s likely that the previous reservation was somehow preserved in the router and this will fix the problem.
    • Just as in this example, the last number should be a higher number because the lower numbers are automatically issued first starting with 10.0.1.2, 10.0.1.3, and so on, as wireless devices join the network. This numbering scheme is based on the default IPv4 addresses for the router. Other routers use 192.168.0.1 or 192.168.1.1 for the router address (gateway).
  10. When you restart your computer, this new IP address specified in step #9 above will be automatically issued by the router based on the MAC Address of your computer.
  11. This new IP address will supersede whatever had previously been configured.
  12. You can now go back into the Airport Utility, following steps 1-9 above. This time, select your computer in the DHCP Reservations list (step #5) and press the minus key to remove this IP reservation.
  13. Restart your computer. It will probably get the same IP address as it had been issued above. Routers will typically reserve an IP address temporarily for a device until a certain amount of time has passed.

Apple Mac OS X Critical Applications Hidden

Problem Summary

Many of the critical Apple utilities that were previously available in the Applications > Utilities folder are now hidden. These instructions show you how to gain access to them.

Problem Solution

Follow these instructions to gain access to these important system utilities:

  1. Go to the Finder (click on your desktop once or click on the face in the lower left of your dock).
  2. From the Go menu, choose Go to Folder and paste in this address:
    /System/Library/CoreServices/Applications/
  3. This will take you to the folder where the special utilities are located.
  4. You can use this method anytime to access the utilities. Or, to save yourself some trouble, click and drag any of the utilities individually to the Dock.


Apple Mac OS X Quit Programs Still Running in Background

Problem Summary

Apple Mac OS X has a flaw that’s been in several versions of the operating system, including the latest public release of Yosemite. Programs that have been quit will still show up as running in the background when you view the Force Quit Applications window (accessible from the Apple menu or by pressing alt/option + command + esc).

Problem Example

In the example shown below, several programs are running, as is indicated by the black dot under the program icon in the dock. The Preview program doesn’t appear to be running since it has no black dot under it. Yet, it is listed in the Force Quit Applications window.

20141021tu-apple-osx-yosemite-programs-still-running-after-quit

This problem seems to happen on a variety of Apple hardware platforms, and with various versions of OS X. For some reason, it’s still not fixed.

Workaround / Solution

At present, the best workaround seems to be periodically checking the Force Quit Applications window, or restarting the computer to ensure all processes are completely stopped and that memory has been properly released back to the system.

Migrating Email and Contacts from Windows to Apple

Summary

This page describes how to copy email messages and other content from a Windows computer to an Apple Mac OS X computer.

Overview

Apple OS X has a migration assistant that is designed to simplify the process of switching from Windows to Mac. However, the migration assistant sometimes doesn’t work, or it can create a mess if you’re bringing in a lot of files you don’t want (it’s not selective). Sometimes manually bringing in your data is best.

Instructions

It would be nice if you could copy your Windows Mail or Outlook Express user profile files to an Apple computer and have Apple Mail import these. However, Apple and/or Microsoft aren’t permitting this. Follow these instructions to make the transfer:

  1. Install Mozilla Thunderbird on your Windows computer.
  2. Download the Thunderbird Import Export Tools Add-on.
  3. Import/Export Tools. From the Thunderbird Tools menu, you can choose Ad-ons. Then choose Install (you may need to click on the little gear if you have the latest version of Thunderbird), then choose the Import Export add-on file you just downloaded in step #2 above. This will install the additional import/export features. You’ll need to restart Thunderbird for the new features to be activated.
  4. Messages. You’ll first want to import all mail account information from whatever client you were using on your Windows computer into the Thunderbird program.
  5. At this point, now that you’ve imported everything into Thunderbird, you can use the Export feature in Thunderbird to export your mailboxes (from the Tools menu).
  6. As an alternative to step #5, you could copy the entire user profile folder. The profile folder is in a hidden folder under your user account.
    • For Windows XP, it’s in the Documents and Settings > UserName > Application Data > Thunderbird > Profiles.
    • For Windows Vista, Windows 7, or later, it’s under Users > UserName > AppData > Roaming > Thunderbird > Profiles.
    • The profile folder will be named with random characters. You’ll want to copy the entire profile folder onto a USB flash drive or other drive to be read by the Apple computer and converted.
  7. Contacts. It may be necessary to separately export your contacts to a contacts file from the mail system you’re using. Or, import them into Thunderbird and have them included in the transfer separately.
    • The process for exporting contacts depends on what email system you’re using. In Thunderbird, go to Address Book > Tools > Export and choose LDIF format. Or, in other systems, if vCard is available, use that file format.
  8. At this point, you should have copied your exported contacts and files (or the user profile folder) onto a USB flash drive or other drive.
  9. On the Apple computer, from the Mail program, choose Import Mailboxes from the File menu. Then select Import data from Thunderbird. The process should bring in your mailboxes and put them in a folder in Mail under the On My Computer heading.
  10. For the contacts, on the Apple computer, open Contacts, then from the File menu, choose Import and select the contacts file you created in step #7 above. This will bring the contacts into your Apple contacts directory.

20141021tu-apple-mail-import-thunderbird

Yosemite Volume Control Feedback

In previous versions of OS X, the volume control would make a clicking sound when adjusted. As of Yosemite, the default setting is to have no audible feedback when adjusting the volume. This is a welcome change since often while wearing headphones, with volume at max, a person would go to adjust the volume and practically damage their hearing from the loud clicking noise.

If you miss the audible clicking sound during volume adjustment, you can get it back. It’s in System Preferences under Sound as shown below. Just put a check mark next to “Play feedback when volume is changed” to get audible feedback. Click the image below for a larger view.

20141021tu-yosemite-volume-control-audible-feedback-click