Evernote – Apple iTunes Login on iOS iPhone iPad

If you’re using Evernote on an iOS device like iPhone or iPad, you’ve probably noticed an annoying and persistent pop-up message asking you to login to your Apple iTunes account with your Apple ID password.

As of today, Evernote has finally acknowledged the problem with the following message on their Help page:

Evernote for iOS: If you’re prompted to sign in to iTunes, please tap Cancel to resume use of Evernote. We’re working on a fix. Thank you for your patience.

Last week, Evernote pushed out an update that caused their iOS software to be very slow and barely usable. There were error messages about the server not being available, and synchronization errors.

What’s troubling about these recent problems from such a well established and trusted company like Evernote is that they represent the ‘canary in a coal mine’ phenomenon of system failures, but here we have not a canary but an elephant in the coal mine. Big reputable companies are starting to show system strain and failure.

Across numerous industries, not just tech firms, we’re seeing poorly developed products that have little or no testing before being pushed out to the public. Any user will immediately notice bugs and wonder “Do they even use their own product?” These aren’t difficult to spot or identify problems.

At the risk of offering an oversimplified analysis, it seems that these kinds of problems usually occur when entire industries try to do more with less. Businesses seeking to become more ‘efficient’ go beyond the point of diminishing returns where the quality of products, services, and workplace satisfaction are degraded. Everyone loses.

We all need to do what we can to emphasize the pursuit of optimal quality rather than maximum efficiency. Quality products, quality workplaces, quality services, and the highest quality of life for everyone we work with.

Universal Wireless Keyboards for iOS, Android, Windows, Tablets and Computers

Summary

As people are increasingly using a variety of computing devices, it’s often necessary to switch between different devices while working. Universal keyboards save space by letting you have a single keyboard at your desk, and switch between devices. So, with one keyboard you can work on your smart phone, tablet, and desktop. Using a single keyboard is helpful because it takes up less space, and you can learn one keyboard rather than three or more. Not all keyboards feature easy switching, so you’ll need to look specifically for that feature.

Typing Efficiency

Laptop keyboards generally have a non-standard placement for arrow keys as well as the CTRL, ALT, Option, Fn (function), and Windows Start key (or Apple Command key). Variations between laptop keyboards, desktop keyboard, and Windows vs. Apple can limit your ability to have high familiarity and efficiency when moving from one computing device to another. Having a single standard keyboard that works on all devices (home, office, mobile) can help.

Keyboard Models

  • Anker® T320 Ultrathin Keyboard – Compatible across Android, iOS, and Windows, enabling you to mix and match with devices.
  • Logitech Wireless All-In-One Keyboard TK820 with Built-In Touchpad – This innovative keyboard seamlessly integrates typing, touch and gestures. So now you have everything you need to control and navigate your computer in one device. With a large, built-in touch pad, you can type and swipe comfortably together. It’s a new way to navigate—especially in Windows 8.
  • Logitech Bluetooth Illuminated Keyboard K810 – Type in style with this elegantly designed, Bluetooth illuminated keyboard for Windows 8. Press one button to instantly switch between typing an email on your Windows PC, taking notes on your Apple iPad or replying to a text on your Android smartphone. With sharp, bright, backlit characters, this keyboard lets you create and communicate more easily on more devices—even in the dark.
  • Microsoft Universal Mobile Keyboard – For iPad, iPhone, Android devices, and Windows tablets. Operating system switch allows you to easily switch between devices.
  • Microsoft Wedge Mobile Keyboard for Windows Tablets – This is a nicely styled keyboard, but primarily for Windows Tablet computers.
  • Minisuit BluBoard – BluBoard supports devices running Bluetooth 3.0 on iOS, Android, Blackberry, Kindle, and Windows. Acer, Blackberry Playbook, Google Nexus, iPad, Mini 2nd Gen, Kindle Fire HD/HDx, Microsoft Surface, Motorola, Samsung Galaxy Note, Tab, and many more!

Photo Gallery

Below are images of the keyboards mentioned above.

Apple iPad Pro Email Signature Duplication Problem

There’s presently an issue that seems to only be happening on the Apple iPad Pro where email signature is duplicated at the bottom of emails when changing the From sending address.

Here’s how to reproduce the error:

  1. Setup multiple send from addresses following the instructions found here: “Using Multiple Send From Email Addresses in Apple iOS.” Keep in mind that this has only been tested for people who have generic IMAP or POP3 email services (like those provided by a website hosting company).
  2. Create a new email message or reply to an existing message.
  3. For the From address, choose an account, and then choose another account. Each time you choose a new account, the signature won’t be replaced (as is normally the case), but instead an additional signature will be placed at the bottom of your message.
  4. If you switch to another app, and return to your in-progress draft email, another email signature will be added again each time you switch away and come back.

If a solution is found, it will be posted here.

Apple iCloud Sync Problems with Contacts and Calendar

You may occasionally experience synchronization issues with Apple iCloud, specifically with contacts or calendar entries.

Most of the time, when you add a contact or calendar event on your desktop or laptop computer, it will immediately and magically show up on all your other devices. However, sometimes it may be several minutes later and it doesn’t show up.

This can be a problem if you leave your home or office, thinking the recently added contacts will now be on your mobile device, but they aren’t.

This problem goes both ways. Sometimes items added to mobile devices don’t show up on their OS X equivalent apps.

So, here’s a trick that just might work:

  • On OS X, you can exit the Calendar or Contacts apps and start them again. This can help force a synchronization with iCloud.
  • On mobile devices, closing and re-opening apps may or may not work. You may need to add a new contact or event for the synchronization to be initiated.

Push technology is supposed to ensure that data synchronization and flow is forced to happen in real-time. However, it sometimes doesn’t work, so these tips can help in such situations.

These problems, and the solutions mentioned above, can actually happen on any synchronization platform (Windows, Android, Chrome OS, Linux, etc.) so it’s not necessarily an issue isolated to Apple.

For Google devices, a check-in can be established by sending an email or checking for new messages. This will initiate communications with their cloud services.

Network Solutions and Apple Email Setup for iOS and OS X

Problem Summary

If you’re a Network Solutions website hosting customer with email service, when setting up email on Apple mobile devices, the default folders may not work, and may not coincide with what is used in the Network Solutions web based email or the Apple OS X desktop Mail client. This is because the iOS and OS X mail clients are somewhat different in how they work. As a result, you might end up with emails going into different folders or no folder at all. This is especially a problem for Sent Mail and Archived mail.

Discrepancies in iOS and OS X Mail Clients

As mentioned above, iOS and OS X use different default mail folders on some email services. Additionally, the OS X desktop mail client doesn’t allow you to specify what folders to use . The iOS mail client does let you select what folders to use. Folders such as Drafts, Sent Messages, Deleted Messages, and the Archive Mailbox can be assigned however you wish in the iOS environment.

Another difference between the platforms is that OS X won’t synchronize with Microsoft Hotmail, but iOS will. So, with Apple mobile devices, you can enjoy the convenience and assuance of knowing that when you delete messages or move them to folders on your mobile device, the same will be done on the Microsoft Hotmail server. However, with the desktop mail client, only downloading of messages is possible (using the decades old POP3 standard).

Preliminary – Archive Folder

The Network Solutions email system does not have an Archive folder by default. If you create one under My Folders on the server in the web interface, it will immediately be given an icon and moved to the top level folders under Trash. Other folders you create under My Folders will remain there with a folder icon, but the Archive folder is special so it gets moved to the quick links favorites area.

This Archive folder is what iOS can use. It will show up in iOS as a top-level folder called Saved in Advanced Mail settings. This is a little bit confusing since you’d be looking for a folder called Archive .

20160130sa0608-iOS-mail-client-folder-assignment

To get to this setting, on your mobile device, go to Settings > Mail > Choose the mail account you want to configure > Click on the email address next to Account > then click on Advanced.

The Archive Folder is a very useful folder to have since many email systems will have a one-click button to move read messages from the Inbox to the Archive folder. It saves a person from the steps required to move messages to a folder (select message, click move, choose destination folder).

An alternative is to go ahead and use the longer three-click process to manually Archive messages by moving them to a folder.

iOS Alias Folder Renaming

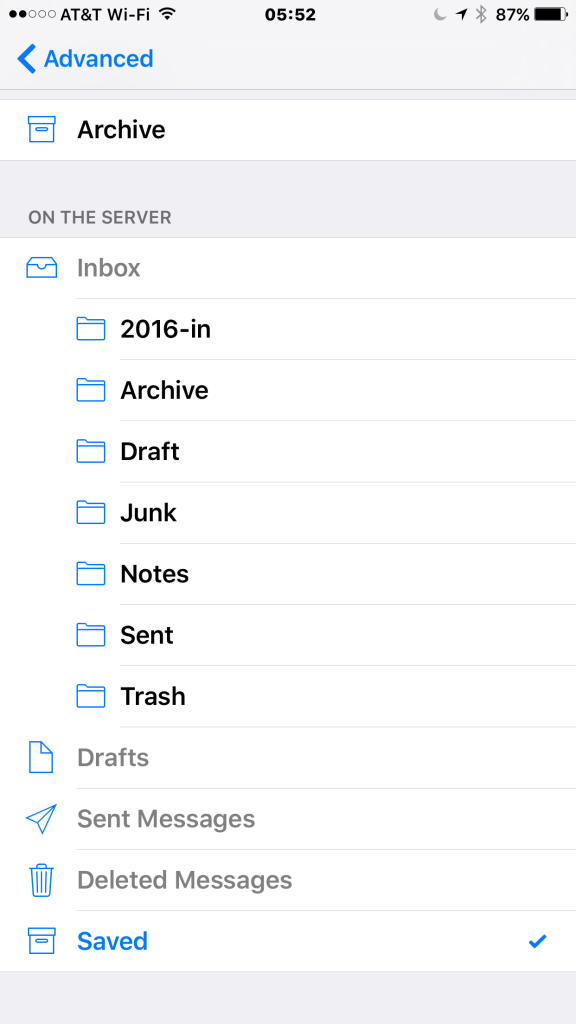
Before folders on the server are assigned to email roles as described below, they will initially appear in the Advanced settings under the On the Server heading below Inbox. Once they are assigned to a role on the iOS device, regardless of what they are called on the server, they will no longer show up under Inbox, but instead they will appear at the top level as an iOS alias name with an icon. The remaining folders available on the server will be listed, but not the ones having been assigned.

Take a look at the image above. Notice the folders under On the Server and Inbox. When you first setup an email account, or before you’ve configured the folder assignment, every folder on the server will show up under Inbox. Once you select the assignment, they won’t show up anymore. So, the top level folders Drafts, Sent Messages, Deleted Messages, are the generic names representing whatever setting /assignment you chose for that folder.

For the remaining instructions, you’ll need to go into the Advanced settings to configure your iOS Mail settings.

For iPhone Running iOS 9.2

Some people will always use a website to check their emails. Other people always use a mail software program to read and compose emails. If you are someone who uses the web interface, you’ll want your folders to be the same on your iOS device. Use these settings on the iOS device to match the Network Solutions default folders.

  • Drafts  — Use Draft folder at the top level On the Server, not the Drafts folder under the inbox tree of subfolders.
  • Sent — Use the Sent folder at the top level On the Server, not the Sent Messages under the inbox tree of subfolders.
  • Deleted — Use the Trash folder at the top level On the Server, not the Deleted Messages under the inbox tree of subfolders.
  • Archive – Use the Saved folder at the top level On the Server, not the Archive folder under the inbox tree of subfolders.
  • Spam – Use the Spam folder under the inbox tree of subfolders.

For iOS 9.2.1 on iPad use the iOS settings above if you’re using the web interface a lot and want the defaults to work, or use the OS X settings described below if you want the Apple Mail client and your iOS devices to be the same. Unlike the iPhone, the folders won’t show up as top level or sub folders in iOS on the iPad. They will all be at the same level so pay attention to the names.

iOS and OS X Incompatibilities

Note that iOS lets you customize server folders for IMAP, but OS X doesn’t allow this. The OS X Mail client creates non-standard folders on the server and forces those to be used. So, in other words, drafts created with OS X will show up in Inbox>Drafts, but drafts created with iOS (or the web interface for the NetSol email) will show up in the top level Drafts folder. The real problem here is created by the fact that Apple Mail on the desktop creates new folders on the server rather than using the existing default server folders. So, the iOS device must be configured accordingly.

OS X Mail Settings for El Capitan

With the desktop Apple Mail program, the following folders will be created on the server and you can’t change or remove them (they will be created again by Mail if you do). It’s important to note that the default settings in Mail may not be correct when you setup a new email account. To check this, go to Mail > Preferences > Accounts > click on the new account > go to Mailbox Behaviors. Be sure to check all boxes in order to save all Drafts, Sent, Junk, and Trash on the server. In this way, all these messages will be available on your various devices.

Here’s an example of what can happen if you don’t store messages on the server. In the morning you might write up an important email and send it out. Then, later in the day, from your phone, you want to see that message again, but you won’t find it in Sent messages because it’s not available on the server, it was just locally stored on your Apple computer.

Here is the folder structure setup on the mail server by the Apple Mail program.

  • Drafts – This will be a folder called Drafts created by Mail on the server under Inbox tree of subfolders.
  • Sent – This will be a folder called Sent Messages created by Mail on the server under Inbox tree of subfolders.
  • Deleted – This will be a folder called Deleted Messages created by Mail on the server under Inbox tree of subfolders.
  • Archive – The Apple OS X Mail Client will use the Archive folder created on the server. It should be setup first on the server so it’s properly recognized at that level in the display of the web interface. Otherwise, it will remain in the tree of subfolders under the My folders heading without an icon in the web interface. If needed, you can move any emails already in the folder to a different folder. Then delete the Archive folder (once you’re certain the emails are moved and backed up). Then when you recreate the folder on the server, it will move to the top-level with an icon.
  • Junk – This will be a folder called Junk created by Mail on the server under Inbox tree of subfolders. This is called Spam in iOS.

Note that in iOS 9.2.1 on the iPad the top level folders may be mixed in with the sub-folders.

Skype for Business is coming to iOS

Soon Lync for iOS devices (iPhone and iPad) will become Skype for Business. The change brings a fresh new look and simplified controls to all the features and functionality you already know.20151010sa2112-skype-for-business

We realize that you have some questions about what the change means for you. Read on!

Why the change?

This evolution combines the ease and familiarity of Skype with the communication and collaboration features of Lync and enables you to conduct your business through an enterprise-grade secure platform using the devices you already have.

What’s new in Skype for Business for iOS?

Skype for Business for iOS includes a new look and feel, at-a-glance view of your upcoming meetings and conversation history, easy call control, and other improvements. And, if your organization uses Skype for Business Server 2015, the ability to communicate with your Skype contacts using IM, audio call, and video call.

Will the update happen automatically?

A limited set of customers is participating in the technical preview. Those customers will receive an email notification with download instructions. Once the final release becomes available later this year, all Lync users, including technical preview participants, can go to the App Store to download it. (Technical preview participants should delete the preview version before installing the final release from the App Store.)

How can I participate in the technical preview program?

The technical preview program is now closed.

Does Skype for Business run on all versions of iOS?

Skype for Business runs on iOS 8.0 and later. If you’re using Lync on an earlier version of iOS, continue to use it.

I’m using Lync 2013 for iOS but my desktop has Skype for Business

The update to Skype for Business will be available through the App Store to all users with iOS version 8.0 or later. To see which version you have, tap Settings (Settings button on the iPhone and iPad) > General > About. Once the update is installed, your contacts and meetings will be there and will work just like they did in Lync. If you’re using an earlier version of iOS, you’ll continue to use Lync 2013.

I’m using Lync 2013 for iOS and my desktop also has Lync 2013

The update to Skype for Business will be available through the App Store to all users with iOS version 8.0 or later. To see which version you have, tap Settings (Settings button on the iPhone and iPad) > General > About. Once the update is installed, your contacts and meetings will be there and will work just like they did in Lync. If you’re using an earlier version of iOS, you’ll continue to use Lync 2013.

I’m using Lync 2010 for iOS and my desktop also has Lync 2010

You will not be able to update to Skype for Business.

I’ve never used Lync or Skype for Business on my iPhone or iPad. Where do I get it?

To use Skype for Business for iOS you need a Skype for Business or Lync account—typically the same user name and password you use when signing in at work or school. If you’re already using the desktop version of Skype for Business, then you have a Skype for Business account. Once the released version is available, you’ll be able to download it from the App Store. See Download, install, and sign in to Skype for Business for iOS devices for more information.

I don’t have an iPhone or iPad. Is Skype for Business available for Android or Windows Phone?

Skype for Business for Windows Phone is available now. See Download, install, and sign in to Skype for Business for Windows Phone 8.1 for details. Skype for Business for Android is now in technical preview. See Skype for Business is coming to Android for more information.

See Also

[Source: Microsoft]

Setup and Use Apple Mac Handoff in iOS and OS X Yosemite

Handoff is one of the new Continuity features introduced in iOS 8 and OS X Yosemite, letting users begin a task on one device and seamlessly pick it up on another.

To use Handoff, you must login to iCloud on your Apple computer and iOS device first and have the feature turned on. On Apple computers, this is found under Settings > General. On Apple mobile devices, this is found under Settings > General > Handoff & Suggested Apps.

Handoff may already be on by default. If so, you may have noticed alerts for incoming phone calls on your computer screen or you may have noticed a small icon in the lower left corner of your iPhone (or iPad/iPod) lock screen. This icon indicates that a supported app/program is running on your desktop Apple computer and you can access the same app and whatever file or task you were doing in the identical spot. On the desktop computer, you may notice an additional icon to the left of the Dock.

There are probably many specialized programs on either your computer or iOS mobile device. The Handoff feature only works with selected programs that are on both systems such as Pages, Keynote, Numbers, and the Safari or Chrome browsers (for example).

Video

Below is a video by MacRumors showing how to setup and use Handoff.

iPhone iOS 8 Contacts Search Results Display Error

When performing a search of your contacts on the iPhone using iOS 8, you may notice that the name at the bottom of the list can’t be seen or selected if the search results fill more than a screen. The last contact in the results will be hidden below the viewable area on the screen.

You can move the search results page up (by pushing it up), but it snaps back again and the last name on the list again returns below the viewable screen area.

In the example below, a search for “wireless” in contacts produces many results. The last few results at the bottom of the list are shown.

By pressing up on the list (scrolling down), the hidden result shows.

The only work-around for this at present would be to create a contact entry that will show up at the very bottom alphabetically for the search result.

Click the image below to enlarge.

20141102su-apple-iphone-search-results-scroll-display-error-1024x768

Apple iPod, iPad, iPhone Photo Transfer and Organizing

Summary

Apple iOS devices have several categories of photos:

  1. Photos. This is a presentation of the photos in your device based on date and location.
  2. Shared. If you have iCloud sharing turned on, you can store, backup, and share photos in the cloud, including having a PhotoStream for easy sharing between devices.
  3. Albums. These are collections of photos organized by galleries of your choosing, rather than organized by date or location.

Photo Organizing Overview

It’s best to move photos and images off your device onto your desktop computer for permanent storage and backing up. You can also use your desktop device to organize the pictures you’d like to keep on your mobile device. Keeping lots of photos in the camera roll for sharing later is complicated because the camera roll doesn’t allow for creating and organizing sub-folders.

Photo Transfer Procedure

Follow these steps to transfer and organize your photos:

  1. Image Capture. Use Image Capture to copy your photos to your local drive. After copying, double-check to make sure they all copied properly. If they are really important, you could back them up as well. Then, using Image Capture, choose Select All and Delete them. This is easier than trying to delete photos in your iOS device.
  2. iPhoto. Usually people connect their iOS device and go directly to iPhoto. However, this isn’t a good idea because the folder structure in iPhoto makes it difficult to easily copy, backup, transfer, or work with other programs. So, you’ll want to keep your original images organized in folders on your hard drive before copying them into any image editing program. If you have pictures you’d like to keep on your iOS device, the best way to do that is to use iPhoto and make Photo Albums. Import the photos you’d like to work with into iPhoto. Then make albums. If you’re using iCloud with iPhoto, you could make some photo galleries in iCloud that will show up on your different devices. Otherwise, exit iPhoto and continue to the next step.
  3. iTunes. To get selected photo galleries / albums into your iOS device, you’ll need to use iTunes and synchronize the device. When synchronizing, you can choose what songs, movies, photos, and other content you’d like put on your device. Choose the photo galleries you created in iPhoto (step #2) above.

20141002th-ios-photography-tips-672x372

Apple Mac OS X iMessage Configuration for Additional Email Accounts

20140226we-apple-support-tips-500x500

Summary

It’s possible to setup iMessage to function with other email addresses. For example, if someone uses your email address (instead of your mobile phone number) to send you a text message (instead of sending you an email to your email address) it’s possible to configure iMessage to recognize that and deliver that text message to the iMessage program on your iOS device(s). This requires an existing Apple iMessage account.

Instructions

Follow these instructions to configure iMessage to function with an additional email address.

  1. Start iMessage on your Apple computer. Do this by clicking on the Messages icon in your Applications list.
  2. From the Messages menu, choose Preferences.
  3. Click on the Accounts tab.
  4. Choose your iMessage account listed in the left column.
  5. Click on the Add Email button on the right.
  6. Type the new email address in the space provided. Once entered, that address will be gray with a message next to it saying Email Sent. It will remain gray and unchecked until you confirm that you’re the owner of that account.
  7. A message will be sent to this new email address. Be sure to check your Junk folder in case it isn’t delivered directly to your inbox. To ensure proper delivery, you may want to add this email address to your contacts: appleid@id.apple.com
  8. You’ll receive an email in the email account for the address you just added in step #6 above. Click the link that says Verify Now >
  9. The link will send you to the My Apple ID page on Apple’s website. Login with your Apple ID cloud account. This step, and the previous two steps, ensure that you are the authentic owner of the email address and also of the Apple cloud account being used.
  10. You should get a message on screen that says, Email address verified.
  11. In iMessage Preferences, the new email address should no longer be gray, but instead be black with a checkmark next to it.