Summary
This page offers a brief introduction to the Plex.tv Media Server system. There is plenty of support online for Plex. However, for the beginner it isn’t quite clear how to navigate around the interface, so that’s primarily what this document is for. Some of the instructions on this page are specific to Linux computers, although the Plex Media Server can run on Windows or Apple as well.
Setup Plex Server
The Plex server software can run on just about any computer (Windows, Apple, Linux), but ideally you would pick a computer that isn’t being used for something else. That way you can ensure it will stay up and running all the time, and be dedicated to video services — without taxing the CPU by performing other tasks. Follow these instructions to setup a computer as your Plex server:
- On the computer that will be used as your Plex server, visit the Plex.tv website and click the Download menu button.
- Under the Plex Media Server heading, click on Computer. This will take you to the download page for computer-based servers.
- The website should automatically detect the correct software for your computer. The minimum recommended system specifications will be listed. Click Download.
- With an Ubuntu (Linux) computer, the software installation should begin automatically Install the downloaded software.
Here are some documents with further reading about installing Plex Media Server:
Connect the Server to Your Plex.tv Account
- Login. Login to your Plex account (while on the Server computer).
- Launch. Click the Launch button in the top right.
- Settings. Click the tools icon in the top right for Settings.
- Connect. Click the Server menu link and then click the Connect link to get to the login screen. Provide your login information. This will connect your server to the outside world and make it accessible to authorized users.
Note that if you’ve reinstalled the Plex software, mobile devices on the same network may be able to still play content, but computers going through the web interface won’t be able to play content until the server has connected to Plex as described above.
Plex Account
You will want a Plex account. The paid account will let you stream video outside your home for access from mobile devices and sharing with friends. There’s a lifetime membership level at $75 (as of 17 September 2014).
Creating Videos
Software programs like Handbrake let you mobilize your physical video media, so you can have DVDs converted to video files viewable on a computer. So, you can convert your DVDs and Blueray media to computer video files (the same video files like those created by a video camera). You can also put your personally created videos on a Plex server for sharing.
About Media Libraries
Media Libraries are collections of Movies, TV Shows, Music, Photos, or Home Videos. These categories determine how Plex will index and display the media. TV Shows are organized by season and episode. Movies are listed with visuals of their cover art and other information.
- Prior to creating a media library, you’ll want to organize your content into folders on your hard drive. For example, one folder for Movies and another folder for TV Shows.
- You can also create folders for groups of Movies, such as all the Lord of the Rings movies. This makes it easier to share just that collection.
- Plex lets you sort and search on many things, but presently it doesn’t allow organizing movies by genre, so creating genre folders could be helpful.
Creating Media Libraries
When allowing others to access and view media on your Plex server, it’s possible to allow access to all content or only certain Media Libraries. This is why it’s a good idea to use separate folders for Media. For example, it would be possible to group movies by their rating and allow access to different libraries by age group and maturity level. That way your entire video collection isn’t accessible to anyone regardless of age. If you have separate folders for videos by a certain category, rating, sequels, or genre (for example) you can share those as Media Libraries individually. You can also create a Media Library that combines several folders into a single Library listing. Follow these basic steps to setup a Library:
- Login. Login to your Plex account (while on the Server computer).
- Launch. Click the Launch button in the top right.
- Add Library. Click the plus (+) link next to your server name.
- Media Type. Choose the type of media.
- Name. Give your Media Library a name, such as Movies, or Sci Fi movies.
- Folders. Choose one or more folders to be included in the library. Click Add Library when done. If you’re unable to view folders on your hard drive(s) then follow the instructions below under the heading When Plex Can’t View Folders.
TV Shows Are Different
Because television shows have seasons and episodes, they are managed differently by Plex.
It was suggested above that movies could be grouped into different folder and libraries. For example, putting all Star Trek movies in a single folder. However, in the case of television shows, Plex uses the folder structure and folder names to properly determine the series.
If you point to a television series folder, and within that folder you have Season 1, Season 2, Season 3, etc. Plex won’t know what Season of what show it is so you might get a mismatch.
Since television shows are automatically grouped and organized, there’s no need to have separate television show libraries. Instead, create a single folder with all television shows each having their own folder, and then sub-folders for each season. Then, Plex will automatically setup the library structure and show the proper cover art and other details for each show and season.
When Plex Can’t View Folders
Sometimes in the process of adding folders to your Library, Plex won’t be able to see folders that exist on your drives. Follow these steps to correct the problem:
- Run Terminal.
- Enter the following command to bring up the settings editor:
sudo nano /etc/default/plexmediaserver
- Use the arrow keys to move down to the bottom of the settings file. The last setting entry is PLEX_MEDIA_SERVER_USER=plex. Change this to your user account name. Then press Control+X to exit, then Y to save. Notice in the example below, the user account is maintenance. Click the image to enlarge.

- Open your Internet browser and enter the following address to initialize the Plex server:
http://localhost:32400/web/index.html#!/dashboard
- Exit your Internet browser.
- Return to the terminal and enter the following command to stop the plexmediaserver process:
sudo service plexmediaserver stop
- Enter the following commands to add plex to your usergroup:
sudo addgroup plex yourusername
sudo addgroup yourusername plex
- Enter the following command to start the Plex Media Server service:
sudo service plexmediaserver start
- Return to your Internet browser and go to http://plex.tv then login with your Plex user account and launch your server window.
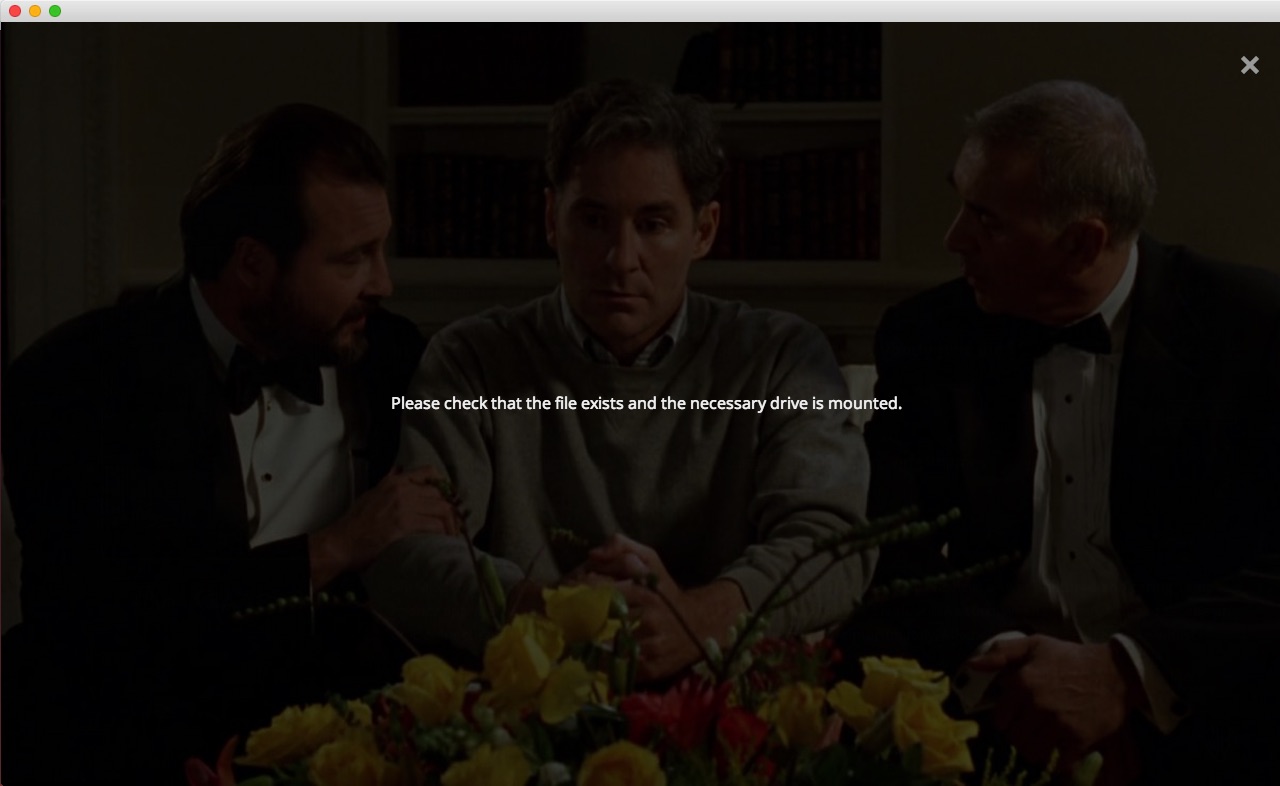
When Plex Can’t Play Content
You may get a message stating, “Please check that the file exists and the necessary drive is mounted.” Click the image for a larger view.

The drives on your computer exist, and they probably appear to be mounted. This can happen on Linux computers, and with Windows computers that have mapped network drives. Once you click on the drives (on the server), and they open, and you see their contents, then other programs can use them. Until you do this, software will assume the drives aren’t available.
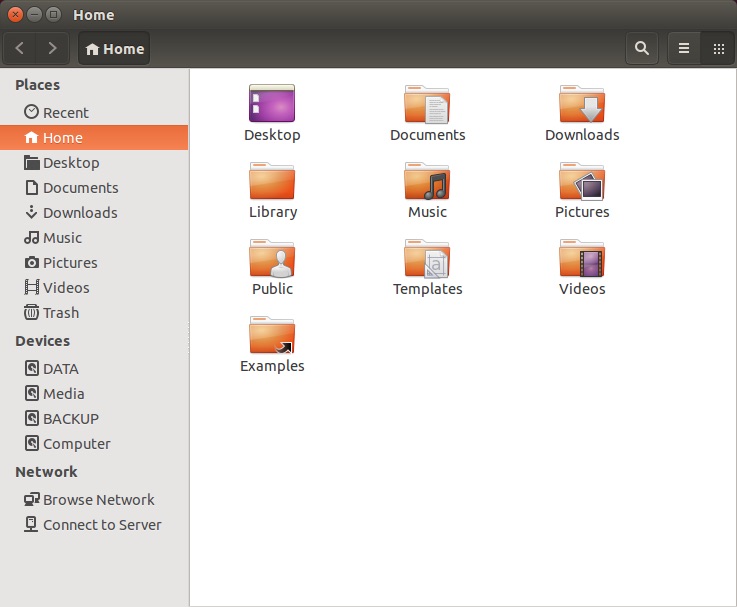
In the window below, you can see several drives are listed under Devices. They have been mounted on startup. Otherwise they wouldn’t be listed here. However the eject symbol is missing on the right. Click the image for a larger view.

Once you click on a drive, or all the drives, the eject icon will show up and then you know that they are accessible to programs as shown below. Click the image for a larger view.

When Old Plex Servers Are Still Listed
Sometimes after a Plex server has been deleted it will still show up in the Plex player client. The problem may very well be that your browser cache is retaining the old server information.
Removing and Reinstalling Plex
There’s a support article about this topic and in that article it is suggested that the Plex Media Server software be completely removed and reinstalled as a first step. However, in testing the above steps, it wasn’t necessary to do this to fix the problem. However, each situation is unique, so removal and reinstallation may help in your case. Here are the instructions to do so.
- Run Terminal.
- Enter the following commands to remove the old installation of the Plex Media Server:
sudo apt-get remove plexmediaserver
sudo apt-get purge plexmediaserver
sudo rm -r plexmediaserver/
- Download the appropriate software from the Plex Media Server Downloads page. The installation should start automatically from the Ubuntu Software Center. If not, you could try entering this command:
sudo dpkg -i plexmediaserver_installation_filename.deb
Here are some documents with further reading about installing Plex Media Server:
Sharing Media Libraries
Follow these instructions to share content from your server with others:
- Click on the Servers menu option (top right).
- Click the Edit Sharing button.
- Anyone you’re currently sharing with will be listed and you can click Edit to select and change what Media Libraries (folders) they have access to.
- Under the Share with heading, you can add people using their Plex username or login email address. If you remove the checkmark next to Share All Libraries, a selectable listing of your libraries will show up and you can pick which libraries the person has access to. Click the Share or Save button to finalize.
Deleting a Media Library
If you’re removing or reorganizing folders, you may want to delete a Media Library. Follow these instructions:
- Login to Plex.tv
- When you hover your mouse to the right of a Media Library name, a pencil (edit) icon will show up. Click the pencil icon.
- From the Edit Library menu, you can change view and change many things, including deleting a library. When you delete a library, you’re not removing all the videos. You’re only removing them from the listing.