A Guide to Regular Tech Care and maintenance Tasks

Many common computer and tech problems that arise could be avoided with some basic maintenance. Here’s a list of suggested tasks to perform regularly.

As a consultant, I usually instruct people on these things whenever I meet with them – providing a personalized strategy that meets their needs.

Daily

If you use your computer regularly, it’s a good idea to have automated daily backups. In many computers these run every hour to backup any recently created or changed files.

When writing longer articles or books that are time-intensive, consider saving frequently using the Save As feature and give the file a name that includes a revision number such as My Great Book Rev 7. Each new version you save provides a backup of the work done so far allowing you to go back in time to a previous version.

A common and sad problem is when people mistakenly select all, delete, and then save their blank document or presentation by mistake. When you save overtop of an existing file, it will be very difficult to recover it.

Weekly

Computers are usually configured to update their software and operating system automatically. However, these updates sometimes don’t happen. For example, if you use your computer for short periods of time, and otherwise have it turned off completely, then the updates won’t happen. Consider leaving  your computer on overnight once a week.

In addition to operating system updates, there will be updates to Java, Adobe software, Microsoft software such as Office (Word, Excel, PowerPoint), and others. It may be necessary to manually check for updates to these.

There are utility programs that scan your computer for software, check the versions, then check with the provider to see if a newer version is available, but this requires an additional program. Sometimes it’s easier just to simplify life and do a few things manually.

Monthly

Virus Scan. Some people seem to get computer malware quite frequently. Other people can go for years without getting malware. You’ll want to determine how often you seem to be getting into trouble with malware and scan accordingly. Monthly scanning is a good place to start. A program like Malwarebytes protects in realtime and also can conduct scanning. Some malware will remove antivirus software so make sure your antivirus is still installed and actively protecting your computer. 

Software Inventory. If you’ve ever installed some software and subsequently decided to stop using it, or gradually used it less and less, then you may want to check your list of installed programs to make sure there are no unnecessary programs. Also, it’s a good practice to ensure that no programs have slipped into your computer as the result of infected websites.

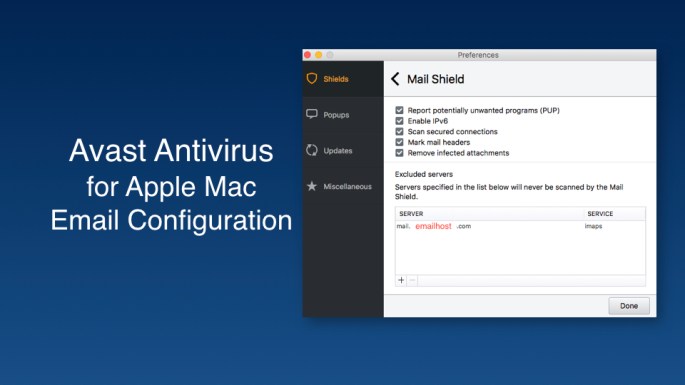
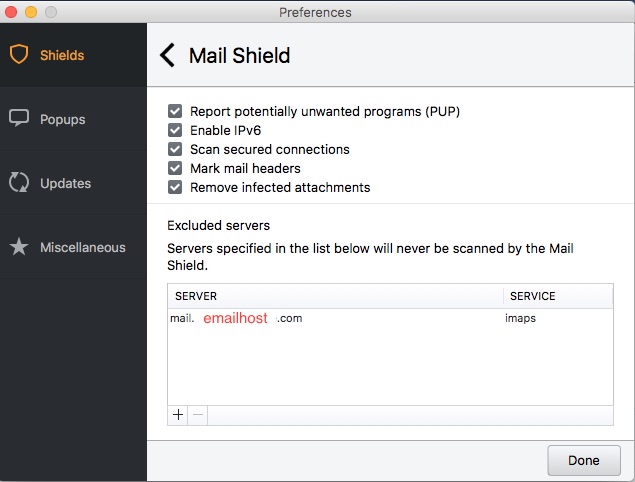
Browser Extensions, Plug-ins, and Add-ons. There are a number of names given to the software that runs within browsers. Some of these applications are useful. Others are malicious or slow down the computer. Programs like Adblock Plus and AdBlocker Ultimate are considered to be okay. Malicious browser extensions can get added without you being fully aware of what is happening. So, it’s good to check for these regularly. Antivirus software isn’t good about blocking these.

Backups. Monthly or perhaps weekly, you may want to check and make sure your backups are running. Be sure the external drive hasn’t become disconnected. Perhaps go through a trial run of restoring a file. Even if you have a cloud synchronized drive (like Dropbox, Box, OneDrive or iCloud) it’s a good idea to have a local backup as well. If a catastrophic failure requires restoring terabytes of data, it will go more quickly with a local drive. Also, if you have huge files to backup, that can take a while to upload those to the cloud given that upload speeds are usually 10% to 20% of  your download speed.

Speed Test. It’s a good idea to check your Internet speed on a realgar basis. A clean ad-free way to do this is to go to Bing.com and search for speed test. You can then use the Bing speed test service.

Data Use. Being mindful of your data usage is important, both for your mobile devices and also your home internet service. Excessive spikes in data usage can be a sign that a neighbor is using your WiFi to download illegal movies that you’ll be legally responsible for, or perhaps a virus has taken over your computer for use as a global file server for illegal unsavory content. If you’re a Mediacom customer, you can go to Mediacomtoday.com/usagemeter/

Hard Drive. Checking your hard drive monthly can help you ensure it isn’t filling up to capacity with data. For each person the frequency of this will be different. If you work with video production, this could be a weekly task. For most people it could be done monthly.

Subscriptions. It’s a good idea to have a spreadsheet where you can keep track of various subscriptions for software and services that may be expiring. This could include antivirus software annual renewals. It could include website hosting and domain registration renewals. These monthly check-ins are a good reminder of when to expect certain fees to be charged. This is also a good time to check your bank and credit card statements for unexpected charges, and when you see renewals coming up, consider cancelling any services you don’t use.

  • Microsoft charges an annual $99 fee for their Office 365 subscription plan.
  • If you’re an iPhone user, check for recurring subscriptions purchased through the phone. To do this, go to Settings > iCloud (not labeled but found at the top of the Settings screen – tap on your name) > Tap on iTunes & App Store > Tap on your Apple ID email at the top of the screen > select View Apple ID > scroll to bottom of screen and select Subscriptions. From there, try to cancel any undesired subscriptions.
  • Also, make a note of any discount or free trial periods that may expire. For example, Sirius XM satellite radio has a $5 per month offer. When that expires, you’ll start getting charged $16 per month.  

Yearly

Cloud Data. Once a year, it’s a good idea to download all the data that services have on you. For example, you can download an archive of everything stored in the cloud of companies like Google or Facebook. That way, you’ll have a backup in case their systems go down, get corrupted, or get hacked.

Email Archive. Most email services maintain every email  you’ve ever sent or received. These can go back years. You may want to use an email client to periodically copy those emails to your computer. Perhaps once a year, copy all the emails that are older than one year. These could be saved on  your local hard drive and backed up. This would allow you to delete them from the cloud service. So, if your email account gets hacked, the hackers have limited access to all your personal communications. There have been billions of accounts hacked in recent years. Hackers use that information to contact all your friends with spam and phishing emails. They can also get insights into what services you use, where you bank, where you go on vacation, door codes you may have given to service people, and other details about your life.

File System. Some information on our computers grows from one year to the next, such as software that contains libraries and collections of music or photos. There may be documents and spreadsheets that contain many years of data. However, other than these dozen ongoing projects and files, there are many documents that can just as well be archived into a time capsule for the year. One method of managing files is to keep top-level folders by year that contain all the files from that year. At the end of December, copy forward any ongoing project files or folders. Leave your music and photo libraries alone (assuming you use software for these). In this way, previous years’ folders become time capsules for that year. If you keep your original photos in folders named by date and event, location, or trip, then you can leave those originals in the relevant year. It’s nice to begin each year with a clean folder structure. Using this method also makes it easier to backup only the current documents from the current year. Previous years can be copied or backed up once since they will remain mostly unchanged.

Passwords. Managing passwords is something that could be done on a monthly basis, but most people are just too busy to commit to a long list of weekly or monthly tasks. At a minimum, it’s important to review your passwords annually. Make sure you have all your login information recorded either using a password management program, or a password protected spreadsheet, or perhaps a bound book. You’ll want to date every entry in your password list. This lets you know when a password was last changed or updated. Keep all the other account information recorded as well, such as security questions. Consider changing your passwords once a year. This could be as simple as adding a unique number to the end of every password. Be sure to use unique and complex passwords for every service you use.

Continuity Planning. If something happens to you, do you have a plan regarding how you want your data and online services to be managed? Once a year, it’s a good idea to review your various online accounts. Choose one or more people to update, maintain, or shut down those accounts if something happens to you. Have a plan for what becomes of your data. For photos, writings, audio, videos, and other content that you’d like to share with family or others, consider having that information  already stored on an external hard drive, or even better, create a personal blog where you share everything in real-time. Then all your insights, humor, wisdom, and so on can be available on the web needing no additional management to distribute. Whatever you decide to do, it’s a good idea to review those plans each year.

THANKS

Thanks to Nicholas Johnson for helpful input that was used to develop this document.

DOCUMENT HISTORY

This document was originally published on 28 Nov 2018 at 1:11 PM CT. Below are notes about modifications and additions since then.

  • 20181226we1158 – Added information about checking monthly for unwanted software and browser extensions.
  • 20181225tu1205 – Added tip about checking monthly data usage.

Creating a Windows PE Bootable USB Drive

Windows PE is a light version of Windows that you can startup on just about any computer with many benefits and uses such as:

  • Diagnostics. It’s very handy to have for basic diagnostics on computers that are having issues.
  • Linux Computers. If you have a Dell laptop with Linux OS installed, and the BIOS updates for the computer are only available as Windows .EXE program files, you can startup with Windows PE, install the BIOS updates, and then restart to Linux again.
  • Data Recovery. With a computer that won’t startup because of corrupt system files, you can startup with Windows PE and access the hard drive.

Creating a Windows PE Startup Disk

To create your own bootable Windows PE USB flash drive, follow these instructions.

Install the Windows ADK

Install Windows PE

  1. Start the Deployment and Imaging Tools Environment as an administrator.
  2. Create a working copy of the Windows PE files. Specify either x86, amd64, or arm:
    copype amd64 C:\WinPE_amd64
    
  3. Install Windows PE to the USB flash drive, specifying the drive letter:
    MakeWinPEMedia /UFD C:\WinPE_amd64 F:
    
    Warning
    This command reformats the drive.

Creating a Visual User Interface

The Windows PE boot disk described above starts up to a command prompt. You’ll probably want a familiar user interface. A popular one is FreeCommander.

__________________

Source: Technet.Microsoft.comTechnet.Microsoft.com (12 May 2017)

Avast AntiVirus for Mac Configuration for Apple Mail

If you’re using Avast AntiVirus for Mac and would like to use the Apple Mail program, you may notice a security certificate error when trying to access your email provider.

Avast has a 23 page document explaining how to correct this error.  The steps involve exporting a certificate from Avast and importing it into your mail client.

Alternative Option

If you don’t care about scanning inbound emails, you can enter your email server address as an exception and Avast won’t try to scan emails from that server. See the example below. To find this screen, open Avast, choose Preferences, then select settings for the Mail Shield. Press the + button to add your mail server.

STEP 1 – Open Avast

20170311sa1747-avast-mac-apple-mail-server-certificate-error-open-home

 STEP 2 – CHOOSE PREFERENCES

20170311sa1747-avast-mac-apple-mail-server-certificate-error-shields

STEP 3 – ADD YOUR EMAIL SERVER

Replace the example below with your own email host. Use POP or IMAP as needed.

20170311sa1747-avast-mac-apple-mail-server-certificate-error

Apple Cinema Display Brightness Control Missing Not Working

If you’re using an Apple Cinema Display as a secondary monitor for your MacBook laptop computer or iMac, you may have noticed that sometimes the brightness control is missing from System Preferences > Displays.

There may be a variety of reasons for this, but one cause is easy to fix. If the USB cable from the display isn’t attached to your computer, the brightness slider will be missing. The display will continue displaying the brightness that it last had until you connect the USB and change the brightness level again.

This was tested and documented using a 2008 era 24″ Apple Cinema Display connected to an Apple iMac (21.5-inch, Late 2013). The issue likely impacts other system configurations.

20161107mo2103-apple-cinema-display-brightness-control-missing-not-working-broken-780x614

Computer problems? Time for an upgrade!

Usually when a computer crashes, the first thing people think about is getting it restored to normal operation.

The effort required to restore a computer to working order is significant. Typically replacement parts are needed. The process of reinstalling the operating system, programs, and data files, is hugely time consuming.

If what you end up with is a computer identical to what you had prior to the crash, then you’ve just lost a lot of time and money for no marginal gain in performance.

However, if you take the opportunity to upgrade your computer’s hard drive to an SSD hard drive, then you can have a large performance gain. It’s also a good time to consider upgrading memory since you’ll be inside the computer anyway.

Hard Drive. Here are the steps required to upgrade your computer to an SSD drive. These instructions are for advanced users only.

  1. Purchase an SSD Drive. You’ll want to purchase an internal SSD drive, click here to learn more about the best choice of SSD or something with similar features.
  2. Backup. Make sure you have a good backup of your files.
  3. Install SSD. Remove your old hard drive and install the SSD drive.
  4. Install OS. Install Windows from the original installation discs, or from the recovery USB flash drive created from your computer. If these aren’t available, purchase Windows 10 on a USB. [Available on Amazon]
  5. Follow the Windows Setup instructions to complete the process.

Memory. For memory upgrades, Crucial.com has a system scanner that helps find the most compatible memory for your computer. If possible, it’s good to upgrade to the maximum amount of memory possible for your computer.

If you have questions, feel free to contact us.


Using Apple iCloud Email and Alias Addresses

The following is from Apple’s support website as of 22 Feb 2016. It’s being reproduced here for archival purposes, easy reference, centralized searching, and also to be disseminated through our social media and network of followers.


Create or change email aliases

An email alias is an email address that conceals your actual email address from a recipient. You could create an alias to use when buying items from online stores, signing up for mailing lists, and registering online, and reserve your real email address for use with family and friends. In this way, aliases can help you better manage the email you receive and monitor the sources of unwanted messages.

You can also send email using an alias.

You can have up to three active email aliases, and you can delete or turn off an email alias at any time. You might want to turn off an alias if, for example, you use an alias to make a purchase. After you receive the item, you can turn off the alias to avoid follow-up advertisements, then turn it on again when you make another purchase.

Deleting an alias is permanent, so if you think you might want to use the alias again, you should simply turn it off. When an alias is turned off, all email sent to that alias is returned to the sender.

Note: If you had five MobileMe email address aliases when you moved your account to iCloud, you retain the five aliases. However, once you delete one of your five aliases, you can’t create a new one to replace it.

Aliases are not transferable. Only the iCloud account that created the alias can use it as an email address.

You can’t use an alias to sign in to iCloud.com, and you can’t use an alias to create a separate iCloud account.

Create an email alias

  1. In iCloud Mail, click the Action pop-up menu in the sidebar, then choose Preferences.
  2. Click Accounts.
  3. Click “Add an alias.”
  4. Provide the requested information:
    • Alias: The text you provide becomes the email address (alias@icloud.com). An alias must contain between 3 and 20 characters.
    • Full Name: The name you provide appears in the From field of the recipient’s email.
    • Label: iCloud Mail uses the label to categorize messages sent to your account.
    • Label Color: Messages appear in your Inbox with the colored label that you specify.
  5. Click OK, then click Done.

Change, turn off, turn on, or delete an alias

  1. In iCloud Mail, click the Action pop-up menu in the sidebar, then choose Preferences.
  2. Click Accounts.
  3. Select the alias in the Addresses list, then do any of the following:
    • To choose a new color for incoming messages, click a Label Color option. Alias labels appear only in the iCloud Mail app on iCloud.com.
    • To change the name or label, enter a new alias name and label in the fields provided. Alias names must contain between 3 and 20 characters.
    • To turn off an alias, select “Disable alias.”

      When an alias is turned off, all email messages addressed to that alias are returned to the sender.

    • To turn on an alias, deselect “Disable alias.”
    • To delete an alias, click Delete.
  4. Click Done.

Select addresses you can send from

  1. In iCloud Mail, click the Action pop-up menu in the sidebar, then choose Preferences.
  2. Click Composing.
  3. Click the “Set a default address” pop-up menu, then choose the address you usually use.
  4. In the list of addresses, select the ones you want to be able to send from while using iCloud Mail.

    The selected addresses appear in the From pop-up menu when you create a new email message. For instructions, see Send email using an alias.

Set a default address to send from

If you created aliases or you have an @me.com or @mac.com address in addition to your @icloud.com address, you can choose one to use as the default address when sending mail from your iCloud account.

  • In iCloud Mail, follow the instructions in “Select addresses you can send from,” above.
  • On your iOS 8 device, go to Settings > Mail, Contacts, Calendars > iCloud. In the Advanced section, tap Mail, tap Email, then tap the address you usually want to send from.
  • On your iOS 7 device, go to Settings > Mail, Contacts, Calendars > iCloud > Account. Tap Mail, tap Email, then tap the address you usually want to send from.
  • On your Mac, open Mail, then choose Mail > Preferences. In the Composing pane, click the “Send new messages from” pop-up menu, then choose the address you usually want to send from.
  • On your Windows computer, do one of the following:
    • In Outlook 2010, 2013, or 2016, choose File > Info > Account Settings > Account Settings, click the Email tab, select the address you usually want to send from, then click “Set as default.”
    • In Outlook 2007, choose Tools > Account Settings, click the Email tab, select the address you usually want to send from, then click “Set as default.”

Apple ID Two-step Verification

Two-step verification is now available for Apple ID account holders. The information below is an overview from the Apple website. You need to sign-in to see these instruction on the Apple site, which you probably can’t do if you’re having trouble with logging in.

Two-step verification for Apple ID.

With two-step verification, your identity will be verified using one of your devices before you can make changes to your account, sign in to iCloud, or make iTunes or App Store purchases from a new device.

(1) You enter your Apple ID and password as usual.

step 1

(2) We send a verification code to one of your devices.

step 2

(3) You enter the code to verify your identity and complete sign in.

step 3

You will also get a Recovery Key for safekeeping which you can use to access your account if you ever forget your password or lose your device.

Simple and more secure.

Once enabled, the only way to make changes to your account will be to sign in with two-step verification.

  • There will be no security questions for you to remember or for other people to guess.
  • Only you will be able to reset your password.
  • If you forget your password, you can reset it with a trusted device and your Recovery Key.

For more information, read the FAQ.

Important things to remember.

Please make sure you understand the important security policies below before you turn on two-step verification.

  • With two-step verification enabled, you will always need two of the following to manage your Apple ID:
    • Your password
    • A trusted device
    • Your Recovery Key
  • If you forget your password, you will need your Recovery Key and a trusted device to reset it. Apple will not be able to reset your password on your behalf.
  • App-specific passwords will be required to use iCloud with any third party mail, contacts, or calendar apps.

Recording Television Shows to DVD with a Digital Video Recorder DVR DVD System

Here are a few of the options available for recording television shows to DVD:

  • TiVo. For about $12 a month, the TiVo subscription service provides a sophisticated user interface and intelligent content searching system making it easy to find and record all of your favorite shows to hard drive media system.
    • A TiVo Roamio DVR deck is required. The basic Roamio system is $200 and records up to 500 hours of programming. The Roamio Plus is $400 and records 1,000 hours of programming along with the ability to watch recorded videos on your mobile device while away from home.
    • To record to DVD, you’ll need Roxio Media Creator (for Windows) or Roxio Toast (for Apple). However, compatibility with TiVo has diminished over the years, and support seems to be nonexistent with only user support forums as a resource.
  • Panasonic DMR-EH69 DVR. A Panasonic DVR system doesn’t have the intelligent channel guide and show searching features of TiVo, but that also means there’s no monthly subscription fee. Once you determine which channel your shows are on, you can program the deck to record them. The 320GB deck is the best choice and can be purchased from Amazon ($450) or World Import ($439). So, it’s similar in price to the TiVo Roamio Plus deck, yet with fewer hours of recording capacity. Read more on Amazon.
  • Magnavox MDR557H/F7. At $326, the Magnavox DVR system with 1,000 GB of storage is by far the best value and offers about 3X the storage of a Panasonic desk. Read more on Amazon.

TiVo to DVD Instructions

Creating a DVD on a PC

To create DVDs on a PC, you will need to install Roxio Creator.

Visit the Roxio Creator 2012 home page for more information or to purchase Roxio Creator 2012.

Hide the steps
  1. Before you begin, make sure that you have transferred your shows to your computer using TiVo Desktop software for PC.
  2. Watch the video tutorial or download step-by-step instructions.

Creating a DVD on a Mac

To create DVDs on a Mac, you will need to install Toast 10 Titanium. To burn Blu-ray discs or HD DVDs of your high-definition TiVo recordings, you will also need the optional HD/BD Plug-in.

Visit www.roxio.com/mactivotogo for more information or to purchase Roxio Toast Titanium software.

Hide the steps
  1. Before you begin, make sure that you have transferred your shows to your Mac using Roxio Toast Titanium software.
  2. Launch Roxio Toast Titanium.
  3. Select the “Video” category, then select the “DVD-Video” project type from the left navigation window.
  4. If not already visible, open the Toast Media Browser by clicking the pull-down “Window” menu and selecting “Show Media Browser.”
  5. From the pull-down menu in the Media Browser, select “TiVo.”
  6. Select the show(s) you want to add, and drag them to the Toast window. Your selected shows will be added to your DVD-Video project.
  7. In the DVD-Video left navigation window, choose a menu style.
  8. To title your DVD, select “More” and enter a DVD title in the “Disc Name” field. Then click “OK.”
  9. Click the red button on the bottom right of the screen to burn your DVD.
  10. In the dialog box, set your DVD burning options and click “OK.”

    Note: If you have Toast Titanium and the HD/BD Plug-in, you can also create Blu-ray discs and High-Definition DVDs from your high-definition TiVo recordings.

See the Toast Titanium User Guide for more about creating DVDs.

MSI Z87I AC Motherboard Essential Guide

Summary

The MSI Z87I AC motherboard has several advantages: it’s small, has plenty of I/O ports, has two Ethernet ports, has integrated video, and comes with powerful wireless capabilities (the AC model includes 802.11ac wireless rather than 802.11n in the Z87I). The information and suggestions on this page are specific to the Z87I AC, but would generally apply to other motherboards.

BIOS Problems

As of October 2014, the motherboards are shipping with version 1.5 of the BIOS that was originally released on 7 January 2014. This is several revisions out of date and has various problems associated with it that are described on this page. The most recent version of the BIOS at this point is version 1.8 released on 18 July 2014. For the most current BIOS, visit the MSI BIOS download page for the MSI Z87I AC.

BIOS Update Instructions

For the reasons described further down on this page, it is essential to update your BIOS. To update your BIOS, follow these instructions.

  1. Visit the MSI BIOS download page for the MSI Z87I AC.
  2. Download the most recent BIOS.
  3. Double-click the file to expand/open it and find the BIOS file. It should have a name like E7851IMS.180 (for version 1.8).
  4. Put that file on a USB flash drive.
  5. Startup your computer and press DEL to enter the BIOS settings mode.
  6. Click on the M-FLASH menu option to view the BIOS flash update menu.
  7. Click on “Select one file to update BIOS and ME.”
  8. Choose your USB flash drive from the list.
  9. Select the file from the list.
  10. Follow the remaining on-screen instructions and watch the computer closely to ensure the process goes smoothly. The computer may automatically restart once the BIOS update is complete.

MSI Z87I AC Restart Problems

With BIOS version 1.5 the computer will shut down properly. However, if you choose the Restart option from within your operating system, or from within the BIOS, it won’t restart. It will just go to a blank screen and not do anything further. This problem is solved by upgrading the BIOS from 1.5 to 1.8.

Won’t Wake on Keyboard Input

Once the computer goes into sleep mode, it won’t wake with keyboard input or mouse activity. This is actually a default setting and can be changed in the BIOS settings. Follow these instructions:

  1. Startup your computer and press DEL to enter the BIOS settings mode.
  2. From the Settings menu, choose Advanced.
  3. Choose Wake Up Event Setup.
  4. Resume from S3 by USB Device is set to Disabled by default. Click this and choose Enabled.
  5. Click the ‘X’ in the upper right corner to Exit the BIOS settings and be given an option to save configuration and restart.

BIOS Clock System Time is Incorrect

You may notice that the BIOS System time appears to be incorrect, and no matter how many times you attempt to reset it, the time is incorrect again. For example, if you’re on Central Daylight Time, you the system time may be five hours ahead. This is actually not an error. Central Daylight Time is UTC -5 hours and the system time is set to display UTC (Universal Time Coordinated or Coordinated Universal Time). So, the time is always automatically setting itself to UTC.

Optimal BIOS Settings

Here are a few settings you may want to set or confirm:

  • Settings > Advanced > Intel Rapid Start Technology. This should be enabled for the fastest startup times.
  • Settings > Advanced > Power Management Setup > Restore after AC Power Loss. Click this and choose Last State or Power On if this is a computer that should be always on. If the power is interrupted, the computer will restart automatically when the power is restored.
  • Settings > Advanced > Windows 8/8.1 Features. This should be enabled if you are running Windows. Otherwise, leave it disabled (if you’re using Linux, for example).
  • Settings > Advanced > Wake Up Event Setup > Resume from S3 by USB Device. You will probably want the ability to wake the computer (or turn the display on from sleep mode) by using the keyboard or a mouse click. This feature is off by default. Click and choose Enabled.

You can learn more by visiting the MSI Z87I AC webpage.

Features

  • Supports 4th Gen Intel® Core™/Pentium®/Celeron® processors for LGA 1150 socket
  • Supports DDR3-3000(OC) Memory
  • USB 3.0 + SATA 6Gb/s
  • Military Class 4: Top Quality & Stability
  • Military Class Essentials: Total Protection for Military Class Motherboards
  • OC Genie 4: Overclock in 1 Second
  • Click BIOS 4: Easily Fine-tune Your System
  • 4K UHD Support: Ultra-high Definition Visual Experience
  • 3 Digital Display Outputs: DisplayPort/HDMI/DVI Support
  • PCI Express Gen 3: World’s 1st PCI Express Gen 3 Motherboard Brand
  • USB Audio Power: A Break Through in USB Audio Quality
  • Command Center: Control & Customize Your PC Settings
  • Fast Boot: Quickly Boot Up & Enter OS in A Few Seconds
  • Wi-Fi 802.11ac, Bluetooth 4.0, Intel® Wireless Display

Photos

Below are photos of the MSI Z87I AC motherboard.

Free Download of Microsoft Office Professional Plus 2013 Evaluation

20140426sa-microsoft-office-2013-logo-icons

Office Professional Plus 2013 is the future of productivity. Office Professional Plus 2013 includes Word, PowerPoint, Excel, Outlook, OneNote, Access, Publisher, and Lync.

Click here for instructions on how to obtain the download.