Apple Mac OS X Quit Programs Still Running in Background

Problem Summary

Apple Mac OS X has a flaw that’s been in several versions of the operating system, including the latest public release of Yosemite. Programs that have been quit will still show up as running in the background when you view the Force Quit Applications window (accessible from the Apple menu or by pressing alt/option + command + esc).

Problem Example

In the example shown below, several programs are running, as is indicated by the black dot under the program icon in the dock. The Preview program doesn’t appear to be running since it has no black dot under it. Yet, it is listed in the Force Quit Applications window.

20141021tu-apple-osx-yosemite-programs-still-running-after-quit

This problem seems to happen on a variety of Apple hardware platforms, and with various versions of OS X. For some reason, it’s still not fixed.

Workaround / Solution

At present, the best workaround seems to be periodically checking the Force Quit Applications window, or restarting the computer to ensure all processes are completely stopped and that memory has been properly released back to the system.

Migrating Email and Contacts from Windows to Apple

Summary

This page describes how to copy email messages and other content from a Windows computer to an Apple Mac OS X computer.

Overview

Apple OS X has a migration assistant that is designed to simplify the process of switching from Windows to Mac. However, the migration assistant sometimes doesn’t work, or it can create a mess if you’re bringing in a lot of files you don’t want (it’s not selective). Sometimes manually bringing in your data is best.

Instructions

It would be nice if you could copy your Windows Mail or Outlook Express user profile files to an Apple computer and have Apple Mail import these. However, Apple and/or Microsoft aren’t permitting this. Follow these instructions to make the transfer:

  1. Install Mozilla Thunderbird on your Windows computer.
  2. Download the Thunderbird Import Export Tools Add-on.
  3. Import/Export Tools. From the Thunderbird Tools menu, you can choose Ad-ons. Then choose Install (you may need to click on the little gear if you have the latest version of Thunderbird), then choose the Import Export add-on file you just downloaded in step #2 above. This will install the additional import/export features. You’ll need to restart Thunderbird for the new features to be activated.
  4. Messages. You’ll first want to import all mail account information from whatever client you were using on your Windows computer into the Thunderbird program.
  5. At this point, now that you’ve imported everything into Thunderbird, you can use the Export feature in Thunderbird to export your mailboxes (from the Tools menu).
  6. As an alternative to step #5, you could copy the entire user profile folder. The profile folder is in a hidden folder under your user account.
    • For Windows XP, it’s in the Documents and Settings > UserName > Application Data > Thunderbird > Profiles.
    • For Windows Vista, Windows 7, or later, it’s under Users > UserName > AppData > Roaming > Thunderbird > Profiles.
    • The profile folder will be named with random characters. You’ll want to copy the entire profile folder onto a USB flash drive or other drive to be read by the Apple computer and converted.
  7. Contacts. It may be necessary to separately export your contacts to a contacts file from the mail system you’re using. Or, import them into Thunderbird and have them included in the transfer separately.
    • The process for exporting contacts depends on what email system you’re using. In Thunderbird, go to Address Book > Tools > Export and choose LDIF format. Or, in other systems, if vCard is available, use that file format.
  8. At this point, you should have copied your exported contacts and files (or the user profile folder) onto a USB flash drive or other drive.
  9. On the Apple computer, from the Mail program, choose Import Mailboxes from the File menu. Then select Import data from Thunderbird. The process should bring in your mailboxes and put them in a folder in Mail under the On My Computer heading.
  10. For the contacts, on the Apple computer, open Contacts, then from the File menu, choose Import and select the contacts file you created in step #7 above. This will bring the contacts into your Apple contacts directory.

20141021tu-apple-mail-import-thunderbird

Yosemite Volume Control Feedback

In previous versions of OS X, the volume control would make a clicking sound when adjusted. As of Yosemite, the default setting is to have no audible feedback when adjusting the volume. This is a welcome change since often while wearing headphones, with volume at max, a person would go to adjust the volume and practically damage their hearing from the loud clicking noise.

If you miss the audible clicking sound during volume adjustment, you can get it back. It’s in System Preferences under Sound as shown below. Just put a check mark next to “Play feedback when volume is changed” to get audible feedback. Click the image below for a larger view.

20141021tu-yosemite-volume-control-audible-feedback-click

Apple Yosemite Finder Window Controls Missing

When starting a program, such as TextEdit for example, a Finder dialog box opens up. Normally dialog boxes have the familiar red, yellow, and green buttons in the top left that let a person maximize, minimize, or close a window. With Yosemite, these controls are missing as can be seen in the window heading below. Click the image to enlarge.

20141020mo-apple-yosemite-finder-dialog-missing-window-controls

Apple OSX Yosemite Spotlight Design Flaw

In previous versions of OSX, the Spotlight (system-wide-search) feature would produce a list of results in a drop-down listing from the top right corner of the screen.

With Yosemite, Spotlight brings up a relatively small window in the middle of the screen. The window can’t be sized or moved. So, it covers up whatever you were working on, and the preview of results can’t be seen properly. Click the image below to enlarge.

20141020mo-apple-osx-yosemite-spotlight-poor-design-cant-size-move-window

On a display of 1920 x 1200 pixels, the Spotlight search results window is about 680×430 pixels in size. So, it’s not quite large enough to fully see the results if an image or document preview is showing.

The window doesn’t have the standard interface buttons for close, maximize, or minimize.

It’s not right for Apple to insist that others strictly adhere to specific user interface guidelines and elements, yet Apple doesn’t offer them in their own programs and features.


Apple Yosemite Mail Features Topic Not Found

If you’re using Apple Mail after upgrading to Yosemite, the initial setup will require an upgrade of your old email mailboxes. The Mail Upgrade box is shown below.

20141019su-apple-mail-conversion

If you click on the Read more… link to learn about new features in mail, it’s possible you’ll get a message stating, “The selected topic is currently unavailable. The topic you were trying to view could not be found.” This is shown below.

20141019su-apple-mail-new-features-window-not-available

Close this message, and after waiting a little while, try clicking the Read more… link again.

You’ll notice that the Mail Help window does not have the same padding (space) above the window control buttons (red, yellow, green dots). Notice that the top corners are squared off rather than rounded. See below for a visual of this. This is likely an oversight by the programmers.

20141019su-apple-mail-help-window-title-bar-not-rounded

Migrating Favorites/Bookmarks From Windows to Apple Mac

If you’re a user of Internet Explorer on Windows and moving to Apple, follow these instructions to get your Favorites/Bookmarks moved over.

Google Cloud Solution

It’s possible to use Google Chrome to transfer your bookmarks by following these steps:

  1. Using Google Chrome, you can sign-in using your Google/Gmail login. Usually Chrome will ask you to sign-in, or you can find it on the menu (three lines found at top right).
  2. Once you’re signed in, the Bookmarks will automatically synchronize with your Google account to any Chrome browser.
  3. So, using the Import Bookmarks and Settings (found under Bookmarks in the Chrome menu) import bookmarks from Internet Explorer and Firefox.
  4. Then these will be synchronized and accessible on any computer or device where you are logged in with Chrome.

Manual Transfer

To manually transfer your Bookmarks follow these instructions:

  1. Go to Chrome, and from the menu choose Bookmarks > Import Bookmarks and Settings.
  2. Select Internet Explorer and/or Firefox as needed for importing.
  3. Then, once all bookmarks are imported, go to Bookmarks > Bookmark Manager > Organize > Export Bookmarks to HTML file.
  4. Put that file on a USB flash drive and put it on your Apple computer.
  5. In Google Chrome, from the Menu, choose Bookmarks > Import Bookmarks and Settings.
  6. On the From dropdown selection menu, select Bookmarks HTML File, then click Choose File.
  7. Select the file you exported in step 3 and 4.
  8. The Bookmarks will be imported and put in a folder called Imported from IE or Imported from Firefox.

Java 8 Update 25 for Apple Max OSX 10.10 Yosemite

Summary

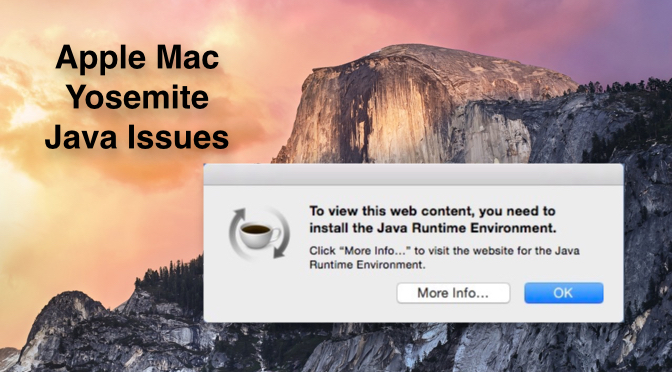
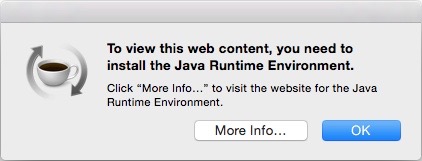
If you If you update to Apple Max OSX 10.10 Yosemite, and you’re using Google Chrome, SPSS, Creative Suite CS4 applications, or other Java dependent software, you may get a message similar to the one below stating that you need to install Java Runtime Environment.

20141018sa-to-view-this-web-content-you-need-to-install-the-java-runtime-environment

You can read this entire page to familiarize yourself with the options available to you and what their impact is. Or, you can begin at the top with the latest information and solutions.

Update 30 August 2017

After three years working with various scenarios, a pattern of success is emerging. Today, on a computer running OS X 10.11 El Capitan, the above error message was appearing when trying to run SPSS. After installing Java SE 6 Runtime, SPSS ran without a problem. So, that simple installation seemed to resolve the problem and may work to resolve the issue for other software and other versions of OS X. You can get the Java SE 6 Runtime installation file here.

Update: 23 April 2015 – Java for OS X 2014-001

For months, if you tried to run the Deltawalker file comparison software, a message like the one above would appear and it would fail to run. However, as of 23 April 2015, if you go to the Java for OS X 2014-001 page on Apple’s website, and click on the Download button, then install that Java update, it fixes the problem and then Deltawalker will run. Let’s hope this resolves other issues.

Update: 20 March 2015 – Java Version 8 Update 40

As of 20 March 2015, if you click More Info on the button shown above, you’ll be taken to a page on the Java website to install the latest Java update which is Version 8 Update 40. Follow the instructions to download and install the Java update. If you’d like to download the file directly, click here. This update should resolve the problem described on this page below.

Revised 16 January 2015

This page was initially posted on October 18, 2014. After a few months, Apple and Sun/Java finally worked out the problems with these updates (described further down the page).

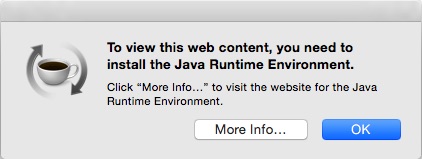
Here are the steps required to install the Java update that will eliminate the notification shown above.

  1. Click on the More Info button in the notification that appears on your screen (example below).
    20150116fr-apple-java-runtime-environment-installation-error-notification-001
  2. On the resulting page (shown below) click the Agree and start Free Download button.
    20150116fr-apple-java-runtime-environment-installation-error-notification-002
  3. Open the downloaded file if it doesn’t open automatically. You’ll see a window like the one below. Double-click on the icon as indicated to install Java 8 Update 25.pkg
    20150116fr-apple-java-runtime-environment-installation-error-notification-004
  4. In the installation window, click the Continue button (as shown below).
    20150116fr-apple-java-runtime-environment-installation-error-notification-005
  5. You’ll be asked for your computer user account username and password as shown below.
    20150116fr-apple-java-runtime-environment-installation-error-notification-006
  6. You’ll probably be asked for the drive to install on, then the Installation Type window will appear as shown below. Click the Install button.
    20150116fr-apple-java-runtime-environment-installation-error-notification-007
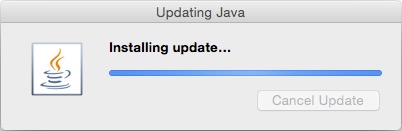
  7. The installation will begin and a progress window will appear as shown below.
    20150116fr-apple-java-runtime-environment-installation-error-notification-008
  8. When the installation is completed, a window will appear as shown below.
    20150116fr-apple-java-runtime-environment-installation-error-notification-009
  9. Your browser window should open to a page like the one below.
    20150116fr-apple-java-runtime-environment-installation-error-notification-010
  10. When you click the Verify Java version button, you should see a confirmation message as shown below.
    20150116fr-apple-java-runtime-environment-installation-error-notification-011

If There Are Problems

There had previously been problems with the installation of this Java update. If you have problems, the information found below may be helpful.

Java 6 from Apple

Apple has provided a version of Java 6 that installs properly on Yosemite. You can download and install that version. Click here to visit the download page on Apple’s website. It’c conceivable that some programs or websites might be looking for elements of Java 6 to confirm that Java is present. Even if you have newer versions of Java (such as 7 or 8) you may still get a message indicating you need Java if you don’t have 6 installed.

Safari Quick Fix

Follow these instructions for a quick fix to this issue:

  1. Begin with all programs closed. You may want to just restart your computer to ensure you begin fresh.
  2. Using the Yosemite Safari browser, visit the Java verify page here:
    https://www.java.com/verify/
  3. This should cause Safari to invoke a launch of the Java update.
    20141020mo-java-7-update-71-software-update-apple-mac-yosemite
  4. Then, perhaps before you can press the Install Update button, another window will open to confirm the installation of the Java update. This is the dialog box to confirm the Java Detection you requested in step #2 above.
    20141020mo-java-7-update-71-software-update-apple-mac-yosemite-confirm-security
  5. Click Run. Then click Install Update in the other window. You may be prompted for your username and password.
    20141020mo-java-7-update-71-software-update-apple-mac-yosemite-installation-username-password
  6. You will then see the series of dialog boxes shown below. Click the appropriate buttons to continue and then restart any programs that use Java.

20141020mo-java-7-update-71-software-update-apple-mac-yosemite-ready-to-install

20141020mo-java-7-update-71-software-update-apple-mac-yosemite-installing

20141020mo-java-7-update-71-software-update-apple-mac-yosemite-retart

This process will update Java for all Yosemite programs that are able to use the updated Java.

Google Chrome Shortcut

Apparently Google Chrome doesn’t work with Java 7 Update 71. The message below explains this, and it’s the page that shows up when you’re in Chrome and try to update Java. Click the image to enlarge.

20141020mo-java-7-update-software-update-apple-mac-yosemite-compatibility

You can install the untested 64-bit version of Google Chrome Version 39, then go directly to the correct download page and download Java 8 (jre-8u25-macosx-x64.dmg) or keep reading to learn more about the cumbersome process most people go through to get to the correct download page. However, if you install Java 8, the necessary Java 7 might not install because the installation will identify a newer version of Java.

The window below will likely show up if you try to download Java for Mac OS X. Click the image to enlarge.

20141018sa-java-for-mac-osx-1010-yosemite-legacy

If you click the “More Info…” button, you’ll be taken to a download page like the one shown below. Click the image below for a larger view.

20141018sa-download-java-8-25

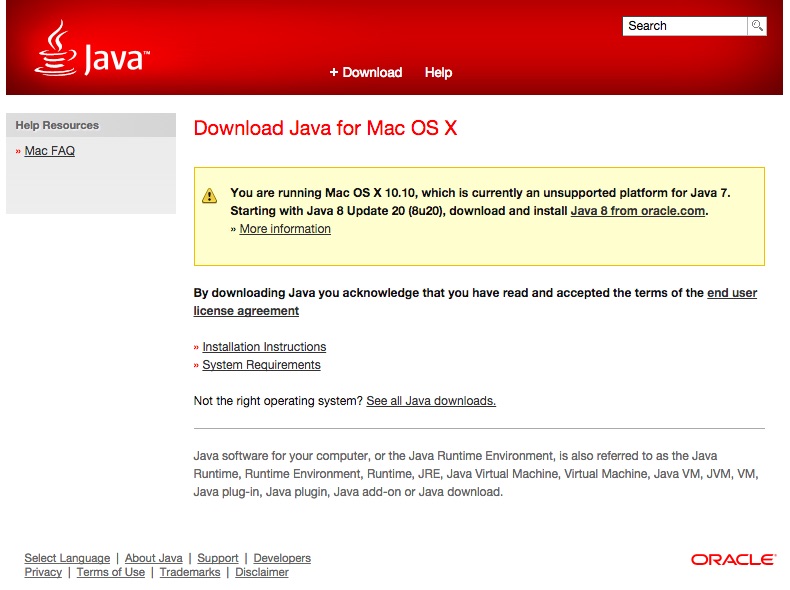
When you click the download button, it will take you to a web page like the one shown below with the message, “You are running Mac OS X 10.10, which is currently an unsupported platform for Java 7. Starting with Java 8 Update 20 (8u20), download and install Java 8 from oracle.com. ” Click the image below for a larger view.

20141018sa-java-for-mac-osx-1010-yosemite-legacy

If you click the More information link, it takes you to the How do I install Java on Mac OS X 10.10 page. However, this isn’t the page you want, instead you should click on the Java 8 from oracle.com link. You’ll be taken to the Java SE Downloads page shown below that may not be easy to follow for most users. Click the image below for a larger view.

20141018sa-java-se-downloads-page-8u25

You’ll want to click the JRE Download button. This will take you to the Java SE Runtime Environment 8 Downloads page shown below. Click the image below for a larger view.

20141018sa-java-se-runtime-environment-8-downloads

Click the white circle on the left of Accept License Agreement. From the list of available downloads, choose the one described as:

Mac OS X x64 …….. 56.76 MB …….  jre-8u25-macosx-x64.dmg

Double-click on the downloaded file and follow the on-screen instructions to install Java.

Compatibility Warning

Once you download Java 8 Update 25, you won’t be able to install Java 7 Update 71 (see message below). So, you may want to directly install Java 7 instead of Java 8, since some programs may look for 7 and not recognize 8 yet.

20141018sa-java-7-wont-install-if-java-8-is-installed

Global Impact

The maps below show recent visitors to this page who have been impacted by this issue. These are just our own page visitors, so you can imagine the thousands of people impacted by this issue.


Creating a Bootable Installation USB of Apple Mac OS 10.10 Yosemite

Summary

Follow these instructions to create a bootable USB installer for Apple Mac OS 10.10 Yosemite.

Prepare the USB Flash Drive

Insert a blank USB flash drive of 8GB or larger, but not unnecessarily too large since it would be wasted space. Run the Disk Utility program found under Applications in the Utilities folder. Then follow these steps.

  1. In Disk Utility, select the USB flash drive.
  2. Click on Partition.
  3. Choose Partition Layout of 1 Partition.
  4. For the Format choose Mac OS Extended (Journaled)
  5. For the Name, type YosemiteUSB.
  6. Click the Options button and choose GUID and click the OK button.
  7. Click the Apply button to make these changes to the USB flash drive.
  8. When asked if you are sure, click the Partition button.
  9. Exit the Disk Utility program.

Download Yosemite

In the following steps, you’ll download the Yosemite files from the App store, but stop before clicking Continue when the installer starts.

  1. Go to the Yosemite page in the App store on your computer.
  2. Click Download.
  3. It will take a while for the download to complete. If you want to view a progress meter, during the download, click on the Updates tab in the App store.
  4. Once the download is complete, an Installer will run and there will be a Continue button. Don’t click that just yet. Instead, continue to the steps below. Then, once the installer is on a USB, you can store the USB somewhere safe and continue with the guided installation from the App Store installer.

Copy Yosemite to USB

In the following steps, Yosemite will be copied to the USB flash drive and it will be made into a bootable drive.

  1. Run the Terminal program found under Utilities.
  2. Select, Copy and then paste the following command into your Terminal window. Although the text wraps here, it will be copied and then pasted as a single command.
    sudo ‘/Applications/Install OS X Yosemite.app/Contents/Resources/createinstallmedia’ –volume ‘/Volumes/YosemiteUSB’ –applicationpath ‘/Applications/Install OS X Yosemite.app’ –nointeraction
  3. Press Enter/Return after pasting in that command.
  4. You’ll be asked for your password. Enter it to continue. The process of copying the files may take 10 to 15 minutes depending on how fast or slow your computer is.
  5. The process will complete and you should see something like this in your Terminal window.

ComputerName:~ UserName$ sudo ‘/Applications/Install OS X Yosemite.app/Contents/Resources/createinstallmedia’ –volume ‘/Volumes/YosemiteUSB’ –applicationpath ‘/Applications/Install OS X Yosemite.app’ –nointeraction
Password:
Erasing Disk: 0%… 10%… 20%… 30%…100%…
Copying installer files to disk…
Copy complete.
Making disk bootable…
Copying boot files…
Copy complete.
Done.
ComputerName:~ UserName$

If everything went okay, then type Exit and press Enter/Return to end your Terminal session. Then quit the Terminal program.

You now have a USB bootable installer for Yosemite. To use this, when starting an Apple computer hold down the Option key and then choose the drive. For now, you can eject it and keep it safe for whenever you need it.

Continue Yosemite Installation

If you’d like to continue the installation of Yosemite that was automatically launched after download from the App Store you can do that now by clicking Continue. Or, you can quit that installer and return later (it’s in your Applications). Once installed, the Yosemite installation files will be automatically deleted. This is why it’s important to create the USB bootable installation drive before you continue with the installation from the App Store.

__________

There were a variety of sources used to create the above non-visual instructions. The most helpful article was on iClarified, and it includes images for those who find that useful.

System Extension Cannot Be Used – AppleUSBEthernetHost.kext

If you’re using an Apple computer, you may get the following error message:

20141014tu0839-system-extension-error

The text of the message reads (provided for screen readers):

System extension cannot be used
The system extension “/System/Library/Extensions/AppleUSBEthernetHost.kext” was installed improperly and cannot be used. Please try reinstalling it, or contact the product’s vendor for an update.

This problem is apparently the result of a recent iTunes update and it is impacting many people.

Follow these instructions to fix the problem:

  1. Disconnect your iPad, iPod, or iPhone from the computer.
  2. Download the latest iTunes software.
  3. Using Finder, navigate to the System folder, then Library, then Extensions and find the AppleUSBEthernetHost.kext file. Move it to your desktop. This will remove it from Extensions.
  4. Install iTunes using the download from step #2 above.
  5. From the Utilities folder in Applications run the Terminal program.
  6. Enter the following command to update the extension. This should all be typed on the same line and then press enter/return. There is a space between kextload and /System…
    sudo kextload /System/Library/Extensions/AppleUSBEthernetHost.kext

Restart the computer just to make sure all changes are saved.

Additional Reading