Apple Computer Slow with AccountSD High CPU Usage and Fans Spinning Fast

You may notice that your Apple MacBook or iMac computer is running slow, the fans are spinning very fast, and the Activity Monitor (found inside of Applications > Utilities) indicates very high CPU usage for the accountsd process. If you have a multi-core processor the percentage of CPU usage may exceed 100% because more than one full CPU is dedicated to serving that task.

The accountsd process seems to have something to do with the System Preferences > Internet Accounts functions including the real-time continuous notification system. This is why it may seem that some runaway task has monopolized your computer’s CPU and is causing it to slow down.

According to some Apple Discussion threads about this issue, Google accounts may be causing problems. However, our tests show that the CPU usage remained high even after deleting all Google accounts. Other accounts that could cause high CPU usage would be Facebook or Twitter since they are always monitoring for recent updates to notify you about.

Removing unnecessary accounts can help get the CPU usage down to about 30-40% which will result in the fans not running so fast.

Standard User Account: Secure your computer with this one simple technique

A government computer security news alert issued on 22 October 2015 offered this simple advice:

“Run all software as a non-privileged user (one without administrative privileges) to diminish the effects of a successful attack.”

There are a lot of countermeasures to prevent or reduce the impact of malware, hackers, and viruses. Yet, none are as simple and sophisticated as creating and using a standard user account.

Configuration

Here’s how to configure a standard user account.

  1. In Control Panel (for Windows) or System Preferences (for Apple), go to Users.
  2. Create a new administrative-level user account. You’ll need to make sure you’re giving this new account administrative rights. The account should have a password as well — one that you won’t forget.
  3. Create a new visitor account with limited access (standard user) for any friends and family who might be using your computer.
  4. Login to the new administrative-level account.
  5. Go to Control Panel > Users.
  6. Set your original user account to be configured as a Standard account.
  7. Logout
  8. Login to your personal account.

Usage

On a day-to-day basis, use your newly configured personal account with limited rights. That way any virus or hacker who has access to your account can’t perform any administrative tasks.

Once a week, or as frequently as seems necessary, login to the administrative account and perform all updates.

Caution

For some versions of Windows, a new user account is created with standard rights by default. So for an administrative account you’ll need to specifically go in and set the rights to administrator. You need to be careful not to end up with no administrative account left on the computer. If that happens, it becomes unusable (at least not updatable).

Be careful to only perform updates and software installation in the administrative account. Don’t install questionable software or visit any unusual websites.

Fix Solution When iTunes Doesn’t Recognize or Find iPhone in Microsoft Windows 10

A recent Windows update causes iTunes to not recognize any connected iPhone, iPad, or iPod. Although iTunes doesn’t see the iOS device, Windows will acknowledge that it’s been plugged in (with the sound alert for connected devices). Windows Explorer also shows the iOS device listed, and the DCIM folder with pictures is viewable. This may also be a problem with Windows 7 and Windows 8.

Fix for Windows iTunes not Identifying iPhone or iPad

The fix for this problem is quite simple. Follow these instructions:

  1. Administrator. Make sure you’re logged into your computer as an Administrator. The username you usually login with may be an administrator account, but if it isn’t, you’ll need to login using a different account such as a Maintenance account.
  2. Device Manager. Once logged in, go to the Device Manager by right clicking on your Computer icon and choosing Properties. Then click on Device Manager. Or, instead, you can get to Device Manager by going to Control Panel > System and Security > System > Device Manager.
  3. iPhone Drivers. From the list of devices, click on Portable Devices. You’ll see Apple iPhone listed. Right click and then from the pop-up menu click on Update Driver Software.
  4. Browse Computer. The driver currently being used for the iPhone (by default) is a Microsoft driver that prevents iTunes from accessing the iPhone. So, you’ll need to browse your computer for the correct iTunes compatible driver. Click on the option to “Browse my computer for driver software.”
  5. Select Apple Drivers Folder. In the browse window, click on the Browse button and then navigate to the Apple Drivers folder found in the following location:
    C:\Program Files\Common Files\Apple\Mobile Device Support\Drivers
  6. Finish. Click the Next button to finish the driver installation update process.

Screen Shots

The images below show the above process. Click any image for a larger gallery view.

Tech Q&A: What kind of external hard drive should I get?

Q: What kind of external hard drive should I get?

A: The best drive to purchase depends on how much storage you need and how you plan to use it. This page offers a few suggestions. Any of these drives would be a good choice, but selecting one based on your needs will be better.

Solid State External USB3 Hard Drive

For most uses, the best external drive to use is the Samsung T1 solid state hard drive (SSD) with USB3 capability. It’s fast, small, light weight, requires no power cord, and has no moving parts. The 250GB model is $120. The 500GB model is $200. The size is about the same dimensions of a small stack of business cards with the thickness of a USB cable. For other drive considerations, keep reading further down this page. [Buy]

20151013tu-samsung-portable-usb-3-external-ssd-solid-state-hard-drive

Passport Size External Hard Drive

If you need more than 250GB or 500GB of storage, you might consider a passport size external hard drive. These use traditional hard drive technology which has spinning metal platers inside. They are slower, bigger, heavier, and use more electricity than solid state drives. However, they are much less expensive and generally store more data. So, they are usually a good choice for photographers and videographers. A good drive to choose is the Western Digital My Passport Ultra drive with USB3 capability and 2TB of storage (2 terabytes = 2,048 gigabytes). The reason to select the 2TB model is because it’s only slightly more money than the 1TB model but has twice the storage. It’s the best value when considering the cost per terabyte. A big advantage of this drive over other drives is that it is powered over the USB cable and needs no power cord. [Buy]

20151013tu-western-digital-portable-usb-3-external-hard-drive-2tb

Book Size External Powered Hard Drive

External powered hard drives generally offer the best value in external storage. They have the advantages and disadvantages of the passport size drive described above. However, the require a power cord and come in larger capacities. A good choice is the Western Digital My Book 4 TB USB 3.0 drive shown below for $127. For people who have large collections of files that they don’t want spread over multiple drives, these are a good choice. [Buy]

20151013tu-western-digital-mybook-external-hard-drive-usb3

Windows 10: Crucial Memory Scan Not Working With Edge Browser

If you use the Crucial.com website for purchasing memory. There’s a very helpful scanner that can identify your computer and tell you how much memory you currently have as well as the maximum installed memory your system is capable of.

The scanner downloads and runs using the browser. If you have Windows 10, you’ll need to use the Internet Explorer browser to download and run the scanner.

If you attempt to download and run the scanner using the Edge browser, it won’t run properly.

Windows: “Get updates for other Microsoft products” not working

It’s important when updating Windows to request updates for other Microsoft products that aren’t directly related to Windows. These may include updates to hardware drivers, updates to Microsoft Office, or other software updates that keep your computer safe and running properly.

For some mysterious reason, Microsoft doesn’t suggest these updates by default. So, most users never get them, and suffer the consequences as a result.

Only if someone specifically asks for these updates will they get them.

However, when you click the option to “Get updates for other Microsoft products” you might find that it doesn’t work, even after you try it repeatedly. This is particularly true for a new computer or computer with a fresh installation of Windows 7.

The screen shots below illustrate this problem that has existed for over 5 years and has never been fixed by Microsoft. It’s consistently duplicatable. Click any screen image for a larger view.

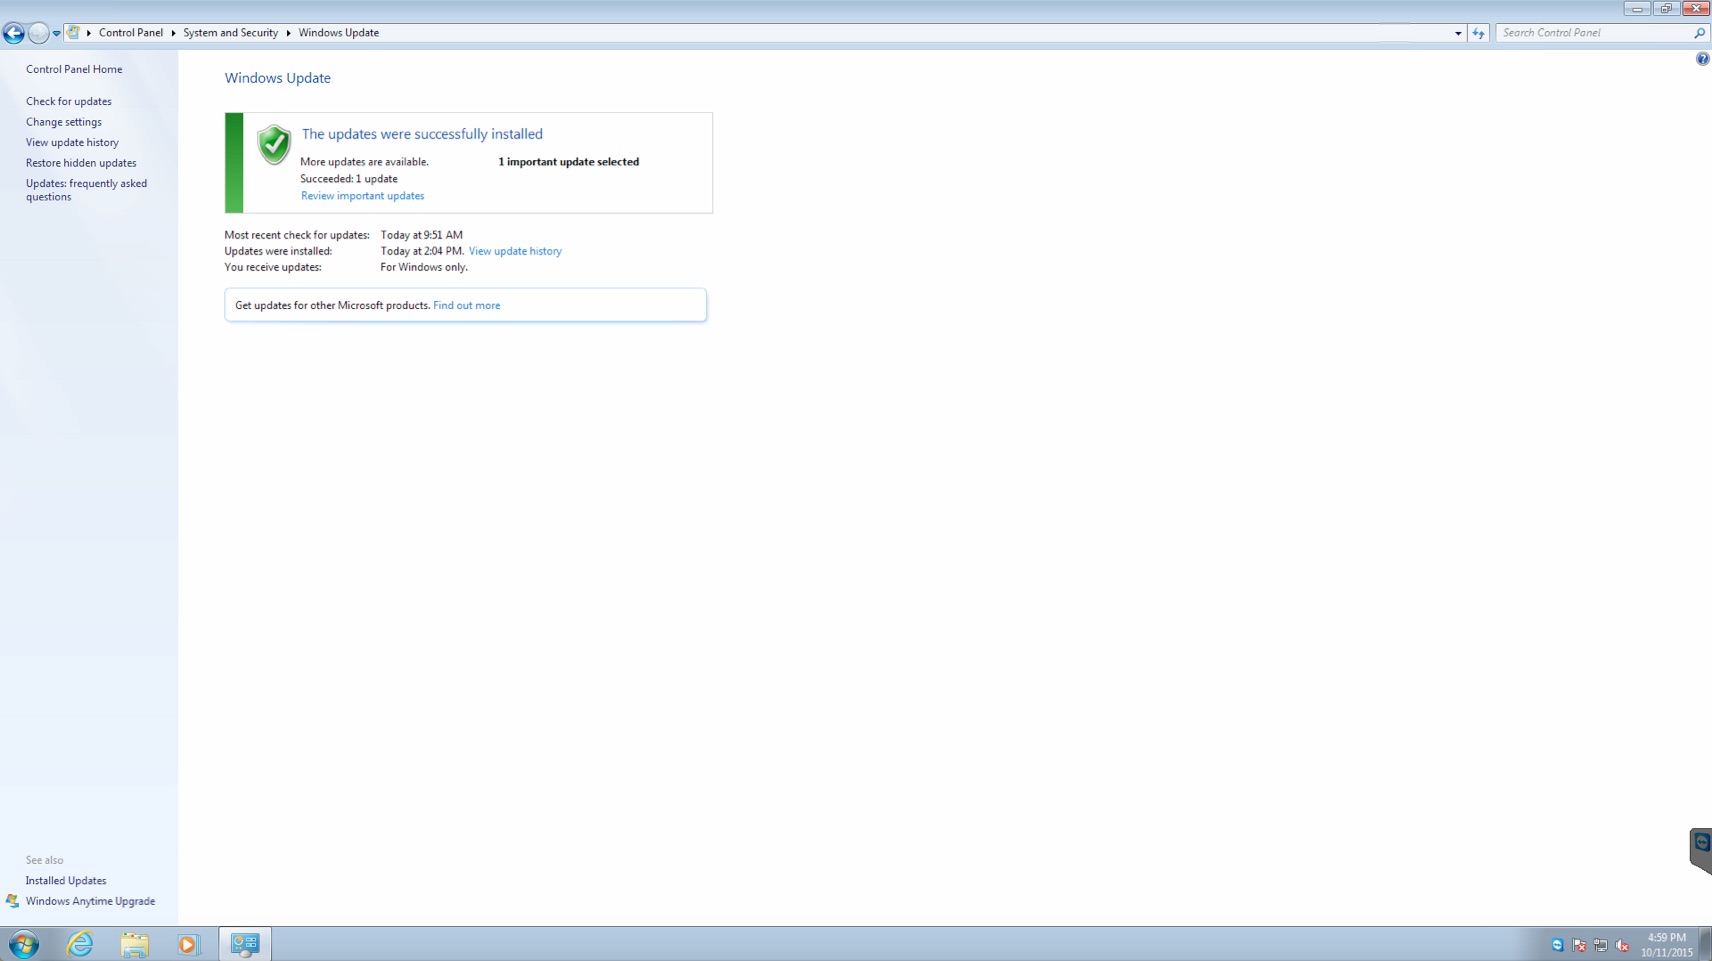
Step #1: Windows Updates Main Screen

Below is the Windows update main screen. You’ll see the option to “Get updates for other Microsoft products” with a link to Find out more.

20151012mo0301-get-updates-from-other-microsoft-products-001

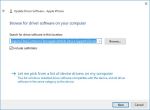
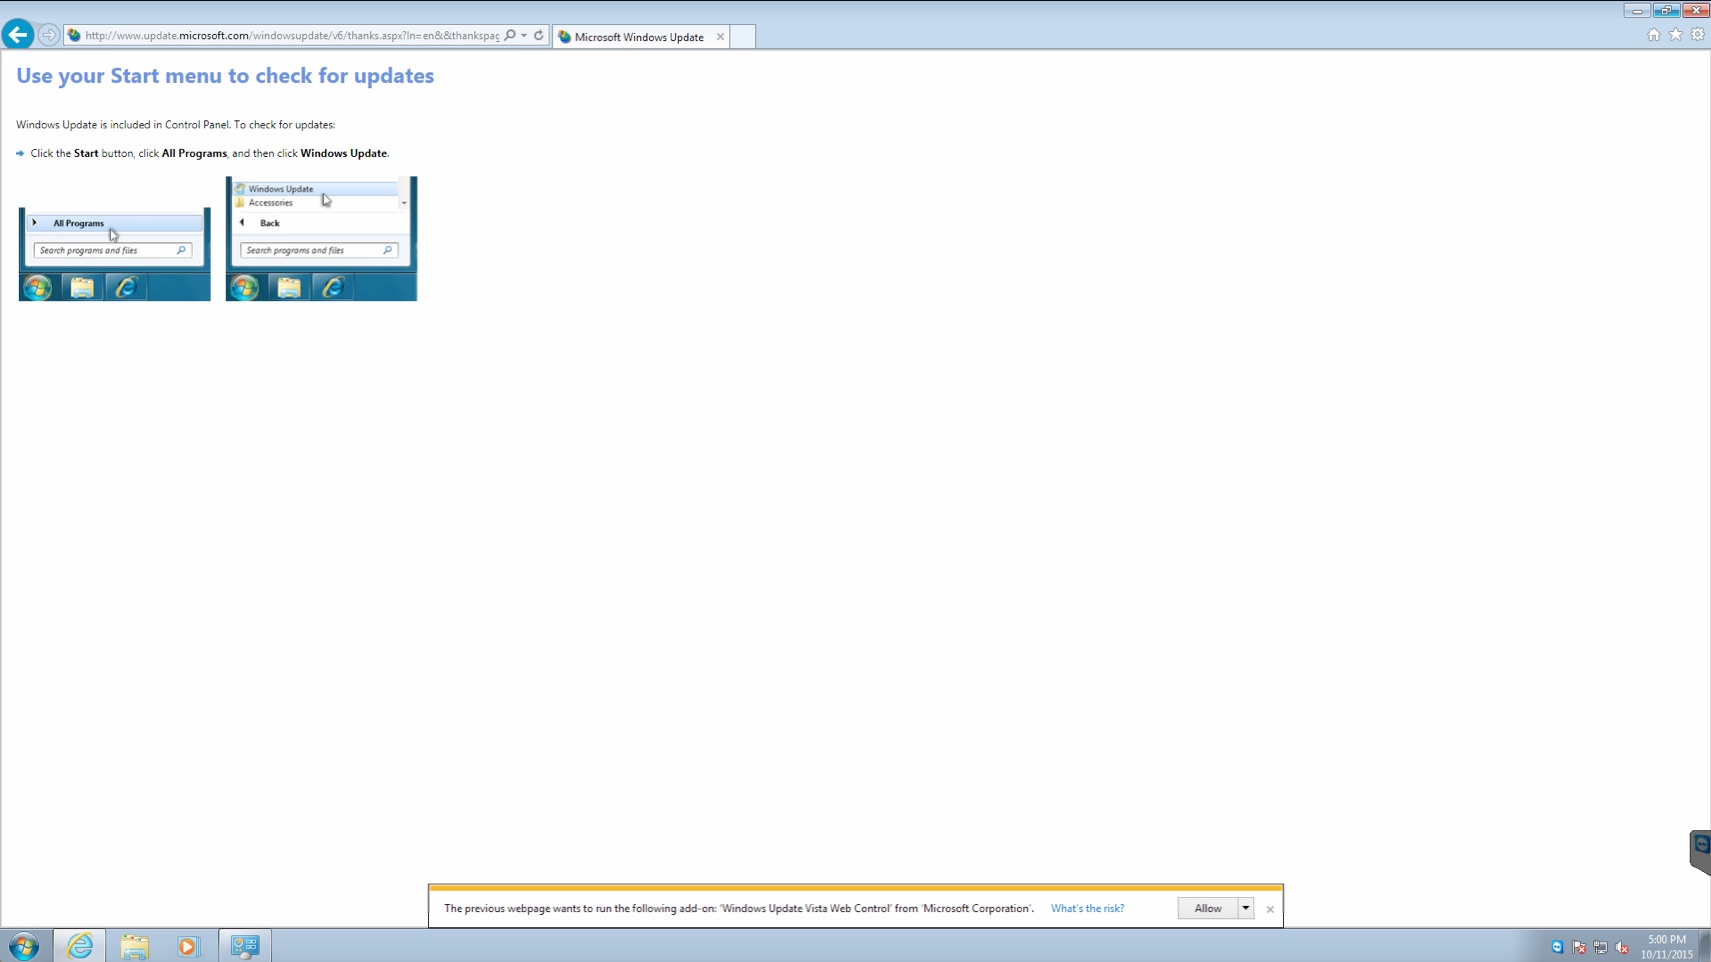
Step #2: Updates for Other Microsoft Products Web Page

If you click the Find out more link mentioned above, it will take you to the web page shown below. However, with the default installation of Internet Explorer, you won’t see the option to Allow the add-on. Instead, you’ll see only the message to “Use your Start menu to check for updates.” Which you’ll soon realize after some futile effort searching for the updates that you just go back to the Windows Update screen shown above. Nothing has changed. So, the message is misleading. One imagines that something has changed, but it hasn’t.

20151012mo0301-get-updates-from-other-microsoft-products-002

You must click the Gear icon in the upper right corner of Internet Explorer, then choose Internet Options > Advanced, and chose to completely reset the advanced settings and browser settings. Then restart the browser. Then go to step #1 above. Then you’ll return to Step #2 and the message shown at the bottom of the screen will appear. Then click Allow. At that point, you’ll see the following screen.

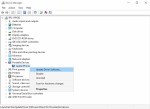
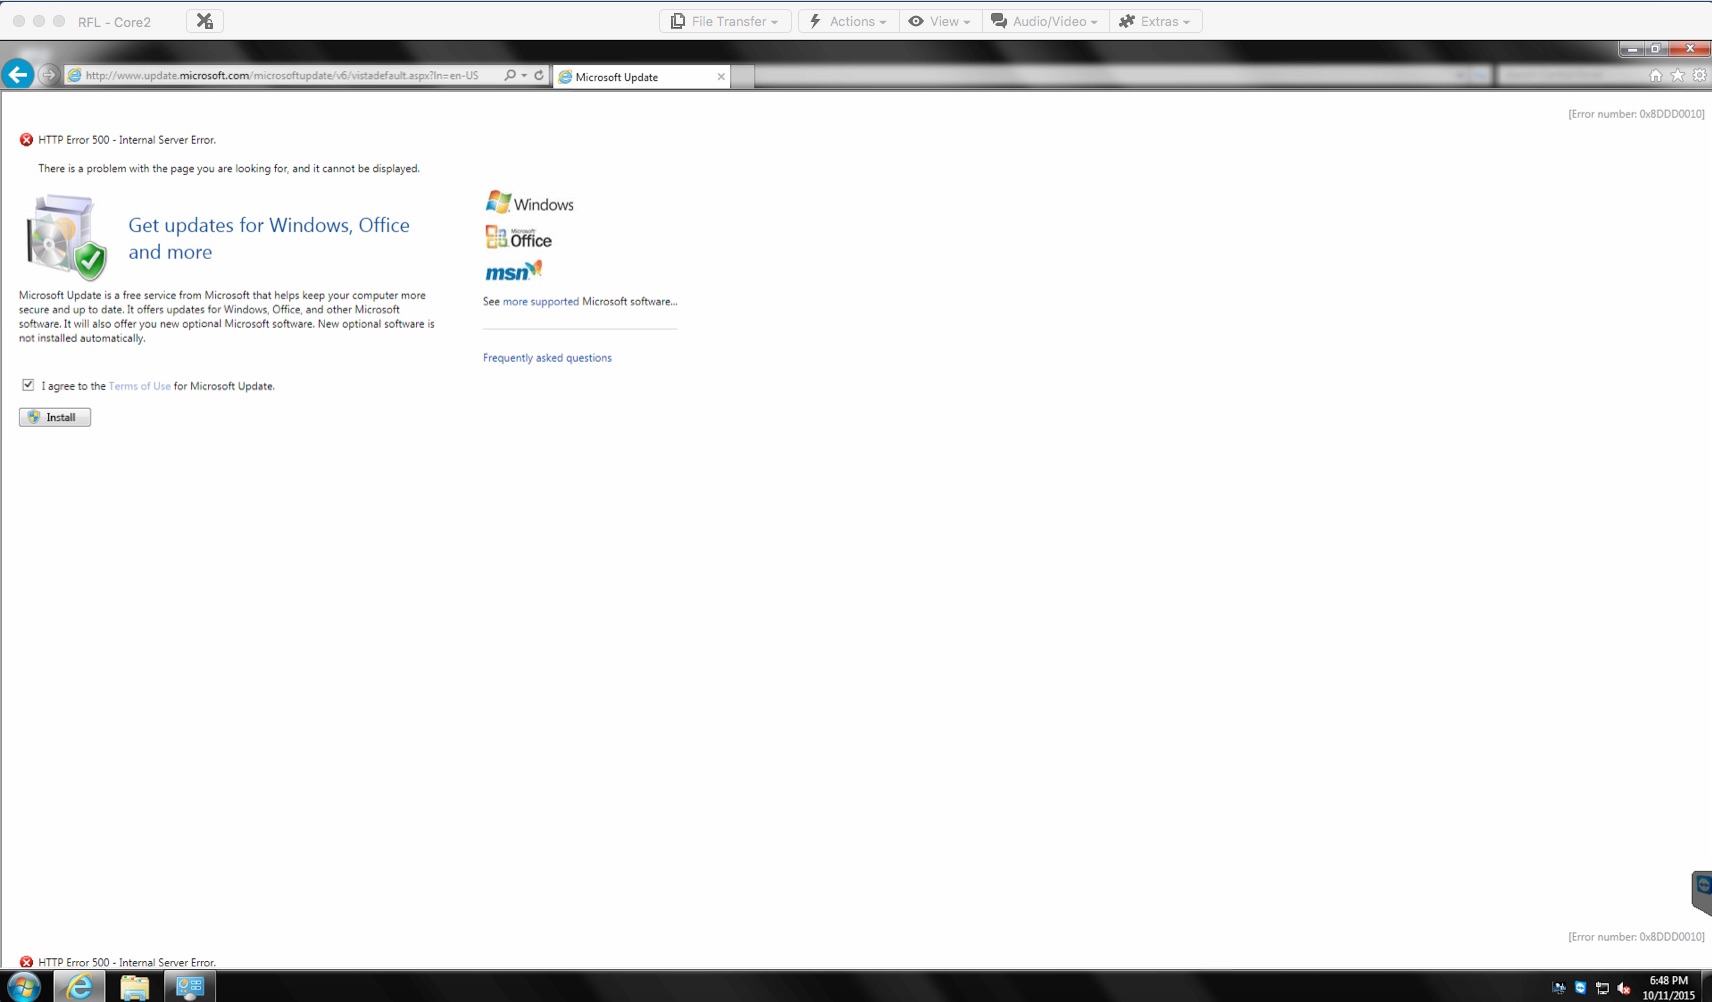
Step #3: Get Updates for Windows, Office, and more

After you reset your browser as described in Step #2, and then return to Step #1 and Step #2 again, you’ll eventually get to a window like the one shown below. Be sure to click on the “I agree” checkmark as shown. Then click Install.

You might notice the HTTP Error 500 – Internal Server Error in the window below. You may get this on your computer. Just ignore it. The process should continue just fine.

20151012mo0301-get-updates-from-other-microsoft-products-003

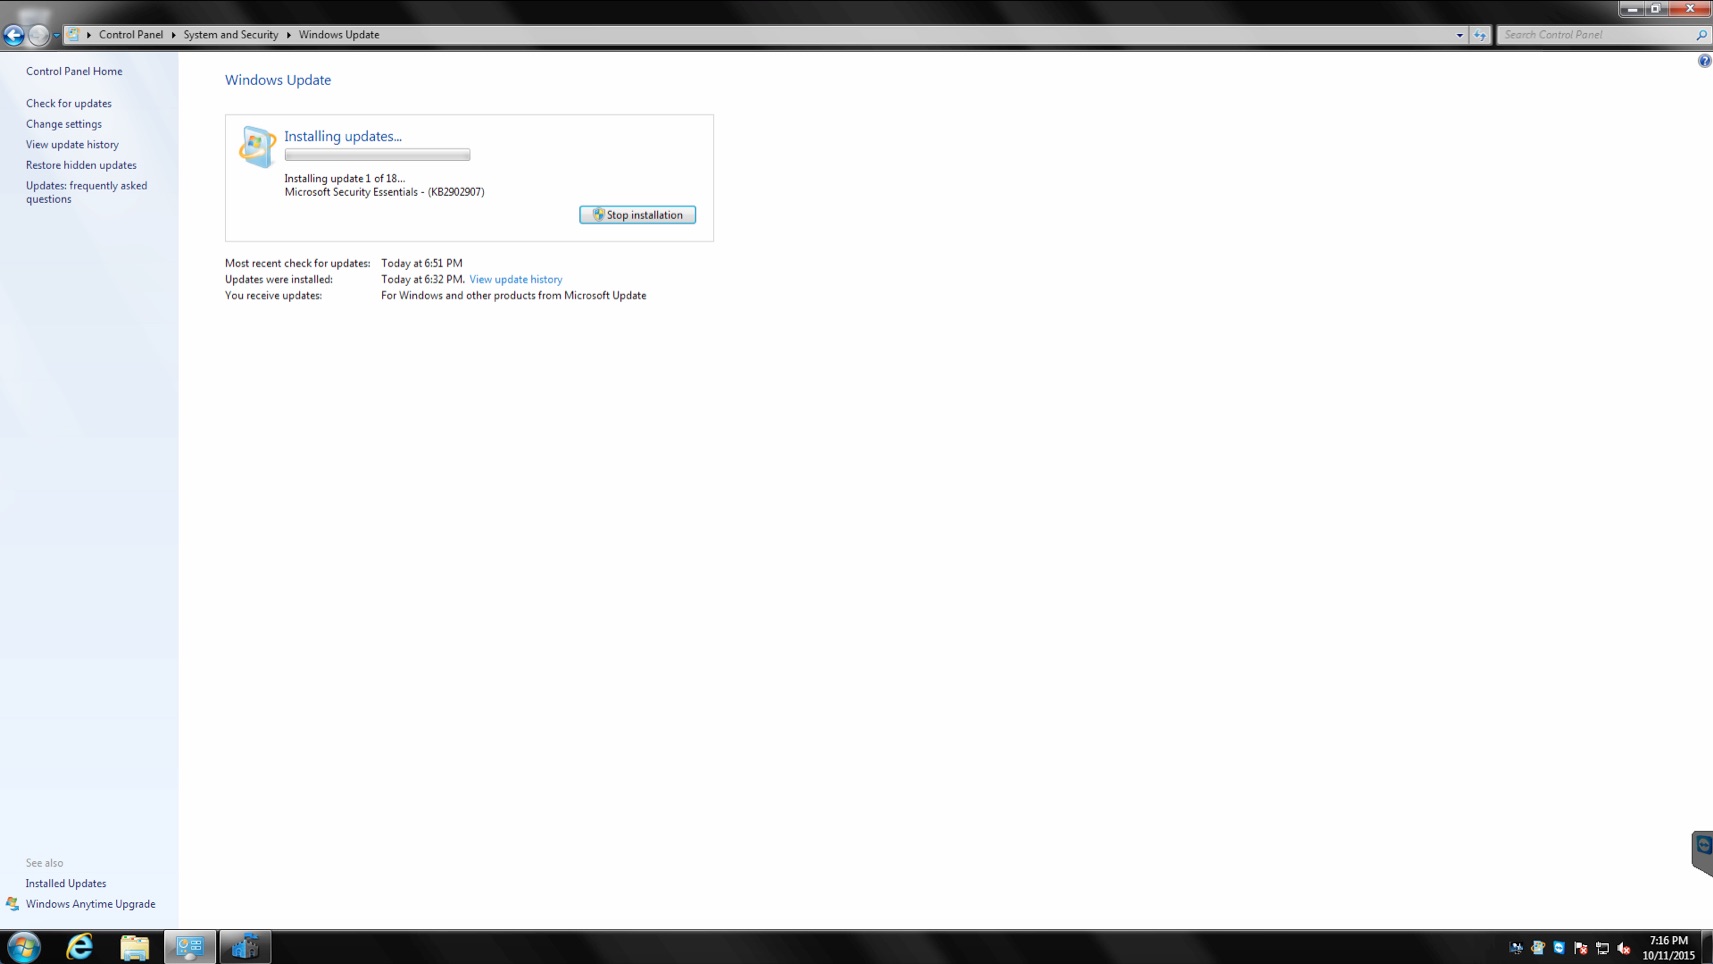
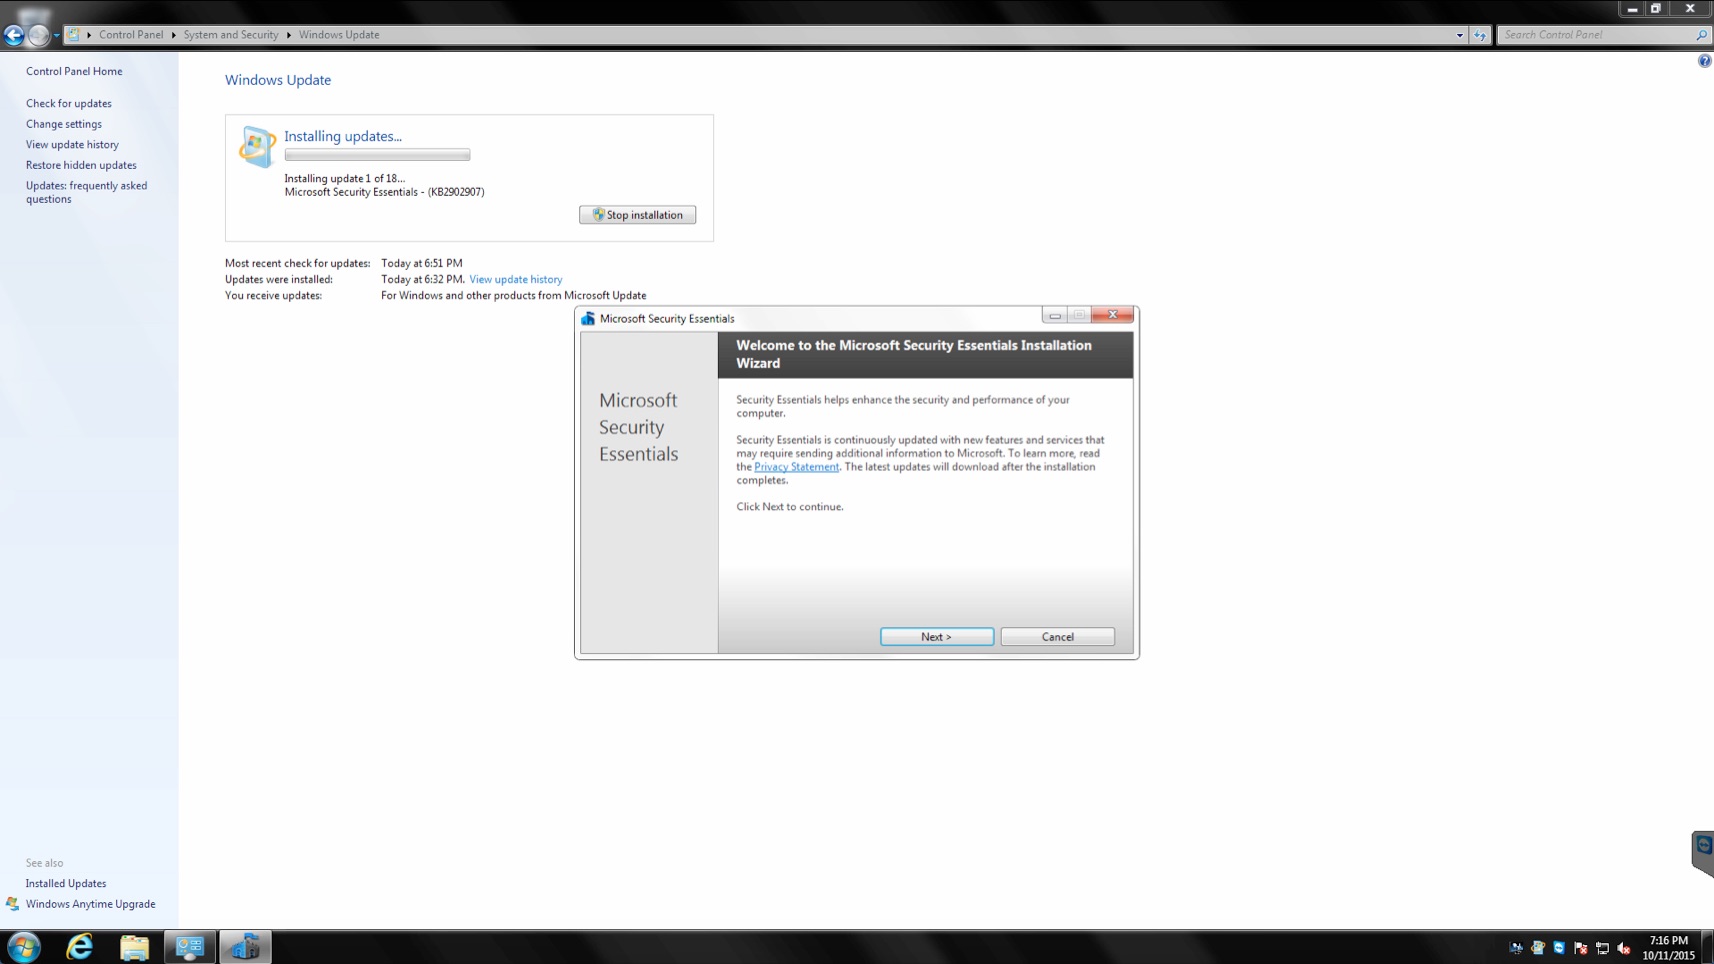
You’ll be taken back to Step #1 again, and this time your computer will check for updates from Microsoft for all their products including some hardware drivers.

Apple Mac OS X Keyboard Shortcuts and Key Combinations

[Source: Apple]

Mac keyboard shortcuts

By pressing a combination of keys, you can do things that normally need a mouse, trackpad, or other input device.

To use a keyboard shortcut, hold down one or more modifier keys while pressing the last key of the shortcut. For example, to use the shortcut Command-C (copy), hold down Command, press C, then release both keys. Mac menus and keyboards often use symbols for certain keys, including the modifier keys:

  • Command ⌘
  • Shift ⇧
  • Option ⌥
  • Control ⌃
  • Caps Lock ⇪
  • Fn
If you’re using a keyboard made for Windows PCs, use the Alt key instead of Option, and the Windows logo key instead of Command. Some Mac keyboards and shortcuts use special keys in the top row, which include icons for volume, display brightness, and other functions. Press the icon key to perform that function, or combine it with the Fn key to use it as an F1, F2, F3, or other standard function key.

To learn more shortcuts, check the menus of the app you’re using. Every app can have its own shortcuts, and shortcuts that work in one app may not work in another.

Cut, copy, paste, and other common shortcuts

          Shortcut Description
Command-X Cut: Remove the selected item and copy it to the Clipboard.
Command-C Copy the selected item to the Clipboard. This also works for files in the Finder.
Command-V Paste the contents of the Clipboard into the current document or app. This also works for files in the Finder.
Command-Z Undo the previous command. You can then press Command-Shift-Z to Redo, reversing the undo command. In some apps, you can undo and redo multiple commands.
Command-A Select All items.
Command-F Find: Open a Find window, or find items in a document.
Command-G Find Again: Find the next occurrence of the item previously found. To find the previous occurrence, press Command-Shift-G.
Command-H Hide the windows of the front app. To view the front app but hide all other apps, press Command-Option-H.
Command-M Minimize the front window to the Dock. To minimize all windows of the front app, press Command-Option-M.
Command-N New: Open an new document or window.
Command-O Open the selected item, or open a dialog to select a file to open.
Command-P Print the current document.
Command-S Save the current document.
Command-W Close the front window. To close all windows of the app, press Command-Option-W.
Command-Q Quit the app.
Command-Option-Esc Force Quit: Choose an app to force quit. Or press Command-Shift-Option-Esc and hold for 3 seconds to force just the front app to quit.
Command–Space bar Spotlight: Show or hide the Spotlight search field. To perform a Spotlight search from a Finder window, press Command–Option–Space bar. If you use multiple input sources to type in different languages, these shortcuts change input sources instead of showing Spotlight.
Space bar Quick Look: Use Quick Look to preview the selected item.
Command-Tab Switch apps: Switch to the next most recently used app among your open apps.
Command-Shift-Tilde (~) Switch windows: Switch to the next most recently used window of the front app.
Command-Shift-3 Screenshot: Take a screenshot of the entire screen. Learn more screenshot shortcuts.
Command-Comma (,) Preferences: Open preferences for the front app.

Sleep, log out, and shut down shortcuts

               Shortcut Description
Power button Tap to turn on your Mac or wake your Mac from sleep.
Hold for 1.5 seconds while your Mac is awake to display a dialog asking if you want to restart, sleep, or shut down.
Hold for 5 seconds to force your Mac to turn off.
Command–Control–Power button Force your Mac to restart.
Command–Option–Power button Put your Mac to sleep.
Shift–Control–Power button Put your displays to sleep.
Command–Control–Power button Quit all apps, then restart your Mac. If any open documents have unsaved changes, you’ll be asked whether you want to save them.
Command–Option–Control–Power button Quit all apps, then shut down your Mac. If any open documents have unsaved changes, you’ll be asked whether you want to save them.
Command-Shift-Q Log out of your OS X user account. You’ll be asked to confirm.
Command-Shift-Option-Q Log out of your OS X user account immediately, without being asked to confirm.

Document shortcuts

               Shortcut Description
Command-B Boldface the selected text, or turn boldfacing on or off.
Command-I Italicize the selected text, or turn italics on or off.
Command-U Underline the selected text, or turn underlining on or off.
Command-T Show or hide the Fonts window.
Command-D Select the Desktop folder from within an Open dialog or Save dialog.
Command-Control-D Show or hide the definition of the selected word.
Command-Shift-Colon (:) Display the Spelling and Grammar window.
Command-Semicolon (;) Find misspelled words in the document.
Option-Delete Delete the word to the left of the insertion point.
Control-H Delete the character to the left of the insertion point. Or use Delete.
Control-D Delete the character to the right of the insertion point. Or use Fn-Delete.
Fn-Delete Forward delete on keyboards that don’t have a Forward Delete   key. Or use Control-D.
Control-K Delete the text between the insertion point and the end of the line or paragraph.
Command-Delete Select Delete or Don’t Save in a dialog that contains a Delete or Don’t Save button.
Fn–Up Arrow Page Up: Scroll up one page.
Fn–Down Arrow Page Down: Scroll down one page.
Fn–Left Arrow Home: Scroll to the beginning of a document.
Fn–Right Arrow End: Scroll to the end of a document.
Command–Up Arrow Move the insertion point to the beginning of the document.
Command–Down Arrow Move the insertion point to the end of the document.
Command–Left Arrow Move the insertion point to the beginning of the current line.
Command–Right Arrow Move the insertion point to the end of the current line.
Option–Left Arrow Move the insertion point to the beginning of the previous word.
Option–Right Arrow Move the insertion point to the end of the next word.
Command–Shift–Up Arrow Select the text between the insertion point and the beginning of the document.
Command–Shift–Down Arrow Select the text between the insertion point and the end of the document.
Command–Shift–Left Arrow Select the text between the insertion point and the beginning of the current line.
Command–Shift–Right Arrow Select the text between the insertion point and the end of the current line.
Shift–Up Arrow Extend text selection to the nearest character at the same horizontal location on the line above.
Shift–Down Arrow Extend text selection to the nearest character at the same horizontal location on the line below.
Shift–Left Arrow Extend text selection one character to the left.
Shift–Right Arrow Extend text selection one character to the right.
Shift–Option–Up Arrow Extend text selection to the beginning of the current paragraph, then to the beginning of the following paragraph if pressed again.
Shift–Option–Down Arrow Extend text selection to the end of the current paragraph, then to the end of the following paragraph if pressed again.
Shift–Option–Left Arrow Extend text selection to the beginning of the current word, then to the beginning of the following word if pressed again.
Shift–Option–Right Arrow Extend text selection to the end of the current word, then to the end of the following word if pressed again.
Control-A Move to the beginning of the line or paragraph.
Control-E Move to the end of a line or paragraph.
Control-F Move one character forward.
Control-B Move one character backward.
Control-L Center the cursor or selection in the visible area.
Control-P Move up one line.
Control-N Move down one line.
Control-O Insert a new line after the insertion point.
Control-T Swap the character behind the insertion point with the character in front of the insertion point.
Command–Left Curly Bracket ({) Left align.
Command–Right Curly Bracket (}) Right align.
Command–Shift–Vertical bar (|) Center align.
Command-Option-F Go to the search field.
Command-Option-T Show or hide a toolbar in the app.
Command-Option-C Copy Style: Copy the formatting settings of the selected item to the Clipboard.
Command-Option-V Paste Style: Apply the copied style to the selected item.
Command-Shift-Option-V Paste and Match Style: Apply the style of the surrounding content to the item pasted within that content.
Command-Option-I Show or hide the inspector window.
Command-Shift-P Page setup: Display a window for selecting document settings.
Command-Shift-S Display the Save As dialog, or duplicate the current document.
Command–Shift–
Minus sign (-)
Decrease the size of the selected item.
Command–Shift–
Plus sign (+)
Increase the size of the selected item. Command–Equal sign (=) performs the same function.
Command–Shift–
Question mark (?)
Open the Help menu.

Finder shortcuts

          Shortcut Description
Command-D Duplicate the selected files.
Command-E Eject the selected disk or volume.
Command-F Start a Spotlight search in the Finder window.
Command-I Show the Get Info window for a selected file.
Command-Shift-C Open the Computer window.
Command-Shift-D Open the desktop folder.
Command-Shift-F Open the All My Files window.
Command-Shift-G Open a Go to Folder window.
Command-Shift-H Open the Home folder of the current OS X user account.
Command-Shift-I Open iCloud Drive.
Command-Shift-K Open the Network window.
Command-Option-L Open the Downloads folder.
Command-Shift-O Open the Documents folder.
Command-Shift-R Open the AirDrop window.
Command-Shift-T Add selected Finder item to the Dock (OS X Mountain Lion or earlier)
Command-Shift-Control-T Add selected Finder item to the Dock (OS X Mavericks or later)
Command-Shift-U Open the Utilities folder.
Command-Option-D Show or hide the Dock. This often works even when you’re not in the Finder.
Command-Control-T Add the selected item to the sidebar (OS X Mavericks or later).
Command-Option-P Hide or show the path bar in Finder windows.
Command-Option-S Hide or show the Sidebar in Finder windows.
Command–Slash (/) Hide or show the status bar in Finder windows.
Command-J Show View Options.
Command-K Open the Connect to Server window.
Command-L Make an alias of the selected item.
Command-N Open a new Finder window.
Command-Shift-N Create a new folder.
Command-Option-N Create a new Smart Folder.
Command-R Show the original file for the selected alias.
Command-T Show or hide the tab bar when a single tab is open in the current Finder window.
Command-Shift-T Show or hide a Finder tab.
Command-Option-T Show or hide the toolbar when a single tab is open in the current Finder window.
Command-Option-V Move: Move the files in the Clipboard from their original location to the current location.
Command-Option-Y View a Quick Look slideshow of the selected files.
Command-Y Use Quick Look to preview the selected files.
Command-1 View the items in the Finder window as icons.
Command-2 View the items in a Finder window as a list.
Command-3 View the items in a Finder window in columns.
Command-4 View the items in a Finder window with Cover Flow.
Command–Left Bracket ([) Go to the previous folder.
Command–Right Bracket (]) Go to the next folder.
Command–Up Arrow Open the folder that contains the current folder.
Command–Control–Up Arrow Open the folder that contains the current folder in a new window.
Command–Down Arrow Open the selected item.
Command–Mission Control Show the desktop. This works even when you’re not in the Finder.
Command–Brightness Up Turn Target Display Mode on or off.
Command–Brightness Down Turn display mirroring on or off when your Mac is connected to more than one display.
Right Arrow Open the selected folder. This works only when in list view.
Left Arrow Close the selected folder. This works only when in list view.
Option–double-click Open a folder in a separate window and close the current window.
Command–double-click Open a folder in a separate tab or window.
Command-Delete Move the selected item to the Trash.
Command-Shift-Delete Empty the Trash.
Command-Shift-Option-Delete Empty the Trash without confirmation dialog.
Command-Y Use Quick Look to preview the files.
Option–Brightness Up Open Displays preferences. This works with either Brightness key.
Option–Mission Control Open Mission Control preferences.
Option–Volume Up Open Sound preferences. This works with any of the volume keys.
Command key while dragging Move the dragged item to another volume or location. The pointer changes while you drag the item.
Option key while dragging Copy the dragged item. The pointer changes while you drag the item.
Command-Option while dragging Make an alias of the dragged item. The pointer changes while you drag the item.
Option-click a disclosure triangle Open all folders within the selected folder. This works only when in list view.
Command-click a window title See the folders that contain the current folder.

Other shortcuts

Learn more

Last Modified: Oct 1, 2015

Microsoft Windows Media Audio Cannot Open Due to Patent Restrictions

In the world of ever increasing patent wars, you may find that your personal audio files become casualties. Imagine having your computer crash. You purchase a new one, and find that hundreds or thousands of audio files are now unreadable because they were recorded using a patented Windows audio format. It sounds like the thing of science fiction, but it’s actually science fact. Take a look at the error message below.

20151011su2045-windows-madia-audio-patent-restrictions

The suggestion is to convert the file, but if it’s protected by patent laws, you won’t be able to open it and convert it.

What you thought was your own personal property is actually owned by Microsoft.

The way to avoid this problem is to record to generic relatively open standards such as WAV or MP3. Make sure that any audio recorder you’re using saves audio files into these more compatible formats.

When Windows Updates Hangs and Stops Progressing

In the process of installing Windows updates, the computer may seem to hang, freeze, or stop progressing with the updates for no explicable reason.

This has been a problem for many years and is an issue that’s never been fixed by Microsoft, despite it being very common, and very simple to resolve. It’s an issue that’s frustrating millions of people. Yet, unfortunately nothing has been done about it.

What happens is that one of the updates will have a pop-up dialog box that’s awaiting user input. However, the dialog box is behind the Windows Updates window. This is because the pop-up is actually configured as a pop-under (behind) so it’s hidden.

An example is below. notice that the Windows Security Essentials icon is in the task bar to the right of the Control panel icon.

When you click on the Windows Security Essentials icon, then the dialog box is revealed. The before and after are shown in the screen shots below.

Example of Windows Updates Not Progressing

Click the image for a larger view.

20151011su1922-windows-updates-stops

Windows Security Essentials Dialog Box Revealed

After clicking on the Windows Security Essentials (fortress icon) in the task bar, the Windows Security Essentials installation dialog box appears as shown below.

20151011su1922-windows-updates-stops-security-essentials-dialog

Tech Q&A: What’s the best computer for a beginner?

When making just about any purchase, we sometimes are drawn to buying an inexpensive entry-level product for ourselves or someone else who is just getting started.

Let’s consider the guitar for example. A beginner might start with one that’s $100. Later, if they really decide they want to stick with it, they will purchase a $200-$500 guitar. However, the ‘beginner’ guitar may be harder to play than the high-end guitar. A nicer guitar is more finely made, with the strings closer to the frets, making it easy to touch the strings and have a solid contact.

The same principle is true for computers. A novice and beginner would be more likely to download programs that can slow down a computer — making a slower low-end cheap computer almost unusable. For this reason, the best computer for a beginner would be a faster computer that is powerful enough to handle the extra stuff a person might put on it. It’s also quicker to repair when the inevitable problem comes along.

By purchasing a nicer computer, the beginner won’t have the disruption, cost, and time loss of upgrading later — at least for not a while.