Fix Solution When iTunes Doesn’t Recognize or Find iPhone in Microsoft Windows 10

A recent Windows update causes iTunes to not recognize any connected iPhone, iPad, or iPod. Although iTunes doesn’t see the iOS device, Windows will acknowledge that it’s been plugged in (with the sound alert for connected devices). Windows Explorer also shows the iOS device listed, and the DCIM folder with pictures is viewable. This may also be a problem with Windows 7 and Windows 8.

Fix for Windows iTunes not Identifying iPhone or iPad

The fix for this problem is quite simple. Follow these instructions:

  1. Administrator. Make sure you’re logged into your computer as an Administrator. The username you usually login with may be an administrator account, but if it isn’t, you’ll need to login using a different account such as a Maintenance account.
  2. Device Manager. Once logged in, go to the Device Manager by right clicking on your Computer icon and choosing Properties. Then click on Device Manager. Or, instead, you can get to Device Manager by going to Control Panel > System and Security > System > Device Manager.
  3. iPhone Drivers. From the list of devices, click on Portable Devices. You’ll see Apple iPhone listed. Right click and then from the pop-up menu click on Update Driver Software.
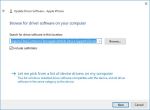
  4. Browse Computer. The driver currently being used for the iPhone (by default) is a Microsoft driver that prevents iTunes from accessing the iPhone. So, you’ll need to browse your computer for the correct iTunes compatible driver. Click on the option to “Browse my computer for driver software.”
  5. Select Apple Drivers Folder. In the browse window, click on the Browse button and then navigate to the Apple Drivers folder found in the following location:
    C:\Program Files\Common Files\Apple\Mobile Device Support\Drivers
  6. Finish. Click the Next button to finish the driver installation update process.

Screen Shots

The images below show the above process. Click any image for a larger gallery view.

How to Find Your Lost iPhone, iPod, iPad, or Apple Computer

Summary

Most mobile devices these days have built-in tracking features that are very convenient for a variety of reasons. For example, health and wellness apps that monitor your activity require location tracking to be turned on. Location tracking can help find lost or stolen devices.

Because of privacy concerns, location tracking is typically an ‘opt-in’ service. Those who decide to not permit location tracking for their devices will not be able to have them easily located and recovered.

For users of Apple mobile devices, you’ll need to enable location tracking prior to attempting to find a lost device.

Instructions

These are the steps you can follow to find a device:

  1. Go to http://www.iCloud.com
  2. Login using your Apple ID.
  3. Click on the Find My Phone icon as shown below.
    20141218th-find-my-phone
  4. The Find My Phone service will display a map with your device or devices indicated on the map with dots. in the example below there are no devices displayed, but when you use the service hopefully your device will show up. Under the All Devices drop-down menu, your available devices
    20141218th-find-my-phone-apple-iphone-ipad-ipod-macbook

Apple iPod, iPad, iPhone Photo Transfer and Organizing

Summary

Apple iOS devices have several categories of photos:

  1. Photos. This is a presentation of the photos in your device based on date and location.
  2. Shared. If you have iCloud sharing turned on, you can store, backup, and share photos in the cloud, including having a PhotoStream for easy sharing between devices.
  3. Albums. These are collections of photos organized by galleries of your choosing, rather than organized by date or location.

Photo Organizing Overview

It’s best to move photos and images off your device onto your desktop computer for permanent storage and backing up. You can also use your desktop device to organize the pictures you’d like to keep on your mobile device. Keeping lots of photos in the camera roll for sharing later is complicated because the camera roll doesn’t allow for creating and organizing sub-folders.

Photo Transfer Procedure

Follow these steps to transfer and organize your photos:

  1. Image Capture. Use Image Capture to copy your photos to your local drive. After copying, double-check to make sure they all copied properly. If they are really important, you could back them up as well. Then, using Image Capture, choose Select All and Delete them. This is easier than trying to delete photos in your iOS device.
  2. iPhoto. Usually people connect their iOS device and go directly to iPhoto. However, this isn’t a good idea because the folder structure in iPhoto makes it difficult to easily copy, backup, transfer, or work with other programs. So, you’ll want to keep your original images organized in folders on your hard drive before copying them into any image editing program. If you have pictures you’d like to keep on your iOS device, the best way to do that is to use iPhoto and make Photo Albums. Import the photos you’d like to work with into iPhoto. Then make albums. If you’re using iCloud with iPhoto, you could make some photo galleries in iCloud that will show up on your different devices. Otherwise, exit iPhoto and continue to the next step.
  3. iTunes. To get selected photo galleries / albums into your iOS device, you’ll need to use iTunes and synchronize the device. When synchronizing, you can choose what songs, movies, photos, and other content you’d like put on your device. Choose the photo galleries you created in iPhoto (step #2) above.

20141002th-ios-photography-tips-672x372