News Feed

How to Secure Your Privacy on Facebook

Facebook acts like it’s a fun social media platform for users of all ages — and it is a guise that works effectively as they continue to collect their users’ personal data. The platform already faced a settlement in 2019 due to privacy concerns. However, former Facebook employee Frances Haugen recently revealed that the company still actively chooses corporate profit over public good. In fact, research confirms that social media platforms directly expose young users to harmful content through deliberate designs and algorithms. So if you’re a social media user, here’s what you need to know about how social media platforms use your data.

What Happens to Your Data on Social Media Platforms?

Social media platforms currently have over 3.6 billion active users. Most of these individuals join these apps to connect with others, which is why no one anticipated that it would be a platform for manipulation and disinformation.

This has prompted experts, like Silicon Valley pioneer Jaron Lanier, to speak up about the dark truths behind these platforms. Lanier’s book Ten Arguments for Deleting Your Social Media Accounts Right Now revealed that social media platforms are constantly monitoring their users to collect data. Corporations then utilize this personal information to manipulate the users’ behavior through targeted social media ads. The book points out that these dangerous advertisements can twist one’s relationship with the truth, distort political views, and influence consumer behavior.

Similarly, reporters Sheera Frenkel and Cecilia Kang revealed that Facebook has also become a platform for disinformation. Their book Ugly Truth emphasized that the social media platform requires each user to surrender personal information upon signup. Unfortunately, this data can be used for targeted advertisements that contain false content. In short, the personal information you share on the platform can be utilized by different entities to manipulate your perceptions for their own benefit.

How Can You Secure Your Privacy on Facebook?

Be Vigilant with Friend Requests

Protect your privacy by being careful with friend requests. Our previously published article here on Iowa City Technology Services states that scammers can infiltrate your account and collect personal information by pretending to be people that you know. Once they gain access to your account, they can use personal information from your posts for identity theft, social engineering, and hacking purposes. Thus, accept requests only when you can verify the legitimacy of the account.

Limit the Access of Your Connected Apps

You can prevent Facebook from running targeting ads by putting a stop to the third-party apps and websites that share your personal information. CNBC states that you can do this by managing your off-Facebook activity through the privacy settings of the app. To start, click the “Settings & Privacy” button then tap on “Settings”. Under the “Your Facebook Information” heading, click on “Off-Facebook Activity” then open the portion called “Manage Your Off-Facebook Activity”. This will help you look into all the apps that are feeding your personal data to Facebook.

Use the Privacy Settings and Tools

Furthermore, you can regain control over your personal information by looking through other privacy settings and tools on your social media apps. Some important tools that you need to turn off are the app’s data trackers, your location data, and even facial recognition features. This limits the amount of data that the app can gather from your usage. You can also limit the users who can see your photos and posts by tweaking your privacy settings.

Facebook is a useful app that allows users to connect with people from all over the world. However, you need to be aware that it can access your personal data through your usage as well as through third-party platforms. However, by restricting your privacy settings, you can prevent the app from accessing your personal information and utilizing it for malicious purposes.


ABOUT — The above article was written by Isaac Burton, and then reviewed and posted by Greg Johnson.

Square Purchase Receipts – Change Your Email

Summary

When you initially make a purchase with a merchant who uses the Square card processing system, you’ll have an option to enter an email address for a receipt.

In the future, when you use that same card with a merchant who uses Square, your email will be automatically saved from the previous purchase.

It’s not possibly to easily update the email at the time of purchase.

Change Email

If you want to change the email address linked to your credit card, it’s necessary to click the “Manage Preferences” link at the bottom of a recent email receipt. This will take you to a page that shows all the cards associated with your phone and email.

You will probably want to save the previous purchase history and list of merchants, then delete the email address that was previously linked.

You will also want to save a screenshot of the old cards linked to your phone. These are probably old expired credit cards that you used in the past.

Unfamiliar Card Numbers

You may see some card numbers linked to your Square profile that you don’t recognized. These may be the alternate credit card number accounts that are generated by the Apple Wallet on iPhone or Watch for purchases.

If you’re curious about the alternate credit card numbers created by Apple Wallet, you can open the Wallet app on your iPhone, select a card, press the three dots menu button (top right) and scroll down to the section “Device Account Number” where you’ll see the 4-digit ending of the card.

In Wallet, the Device Account Number is described in this way: “Apple Pay uses the Device Account Number instead of providing your credit or debit card number. This number can only be used with this iPhone.”

This may initially create some confusion because in trying to match your printed receipts with credit card accounts, you won’t initially recognized the numbers.

Clarification

Note that Square is a common business name. This article is about the payment processing company used by restaurants, coffee shops, and some individual entrepreneurs. Learn more at SquareUp.com

This article is not about Square Trade, the warranty company.

Tech Tip: Focus Without Distractions Using Driving Mode All Day Long

Here’s a great way to stay focused, distraction-free, and be productive all day when you have big projects that require creativity and concentration.

In addition to using Driving Mode while driving, you can use it anytime you want to focus and automatically notify people that you’re not available. This and some other suggestions below can help you stay focused.

These tips assume you are using an iPhone, but similar features should be available on phones with Android.

  1. GREETING. Set an outgoing message to let people know you’ll be unavailable, and perhaps indicate when you might get back to them.
  2. DRIVE MODE. Set your phone to Driving Mode and enable an automatic reply for text messages to let people know you’re unavailable.
    • CONTROL CENTER. On an iPhone you can go to Settings > Control Center > and add an icon for Do Not Disturb While Driving. Then you’ll have easy access to enable Drive Mode.
    • ACTIVATION MODE. Then, go to Settings > Do Not Disturb > to set the Activation to Manually. This allows you to turn on Driving mode any time.
    • AUTO REPLY. Then set the Auto-Reply text message, such as “I’m unable to respond at the moment. I’m either driving, in a meeting, or you’ve reached me after hours. I’ll try to get back to you as soon as possible. Thanks!”
    • ALLOW FROM. In the Do Not Disturb settings you’ll see an option to Allow Calls From certain callers so you won’t miss an emergency call. Or, for repeated calls from the same person within three minutes.
  3. MUTE. Mute sound effects on your phone. This will silence notifications and other distractions. The Drive Mode should already have enabled the Do Not Disturb mode.
  4. WATCH. On your smartwatch enable Do Not Disturb, Theater Mode, and Silent Mode. Place your smartwatch with the screen away from you to avoid distractions from on-screen notifications.

Special Considerations

While in Drive Mode your smartphone will usually prevent any interaction, since most cars provide an on-screen display for answering phone calls and using map navigation. The phone itself will not be usable, so if your work requires use of the phone these tips won’t work.

You could consider having a secondary phone, either on a phone plan or without a phone plan using WiFi only, to continue with iOS or Android tasks and not be interrupted by calls or text messages.

Unlock Mac with Apple Watch Not Working [SOLVED]

If you’ve been using the Apple Watch feature that allows you to unlock your Apple computer and find that it stops working, Apple offers a long list of suggestions to help you get it working again or set it up for the first time.

If you’re wanting to save some time, try these two steps first:

  1. Press and hold both buttons on the side of the watch until it restarts and you see the Apple logo.
  2. Go to System Preferences on your Mac, and under Security, under the General tab, make sure you have selected “Allow your Apple watch to unlock your Mac.”
  3. If the box is already checked in step #2, remove the checkmark, return to the main System Preferences window, go back to Security > General, and check the box again.

It’s very likely that the feature will work now. If not, you will want to review the long list of suggestions from Apple which go into more details about other requirements to make the feature work – such as making sure the watch and computer are both signed into the same Apple ID account and that the computer has WiFi turned on.

Best Desktop Computer – May 2019

I’m often asked what I think is the best desktop computer. If a person wants a Windows computer and wants to buy local, then there’s one computer I would recommend.

It’s the HP Pavilion with a Core i5, 12GB Memory, 128 GB solid state hard drive and 1TB traditional drive from Best Buy for about $780. [View/Buy]

If you look at the other computers at Best Buy, whenever I’ve checked none have solid state drives so they will be slow and susceptible to hard drive crashes.

HP has a nice 17″ display for $180 that works nicely with the computer mentioned above. [View/Buy]

I’ve had many people purchase this computer/display combination and they have all been very happy with it.

Staples, Cosco, and other local vendors have desktop computers, but I don’t think they regularly have desktop systems in stock with solid state drives.

Feel free to contact me if you have any questions.

Apple MacOS 10.14.4 Safari Bug Results in Unwanted Enter/Continue During Login

Once you’ve updated your Mac to Mojave and have the MacOS 10.14.4 latest version of Mojave, you’ll notice that Safari now provides the username and password for your websites as it did in the past (if you use the feature) but now it will automatically press Enter/Return.

If you’ve recently changed your password, and it hasn’t been updated and saved to the browser yet, you’ll select the login username (perhaps a long email address that you don’t want to manually type) but then instead of being given an opportunity to type in your new password, the browser will immediately attempt to log you in, resulting in a failed login attempt.

Captcha systems will fail because you’ve not been given a chance to validate those.

Assuming the browser provides the correct password, you won’t have an opportunity to click on checkboxes indicating “please keep me logged in” because you’ll be logged in right away.

According to a discussion thread on the Apple support forum, there is no way to fix this.

What’s disappointing about this bug, as with others, is that it’s easily identifiable as a user interface problem within minutes of using the new browser. This suggests that little if any real world testing was done. This happens a lot. Apple will release a new version of something, and users will immediately identify a user interface problem. It’s as if nobody is actually using the software they are developing.

Saving Voice Memos to Your Apple Mac Computer

If you’re using the Voice Memo app on your Apple Mac computer, you may notice that the File menu lacks the Share or Export option found in other Apple software programs.

Follow these steps to save an audio recording to your Apple Mac computer:

  1. Start the Voice Memo program on your Apple Mac computer.
  2. Find and select the audio recording you would like to share.
  3. In the upper right corner of the program, click on the Share icon (a box with an arrow pointing up). You will see a menu of options.
    20190331su1518-apple-mac-voice-memo-software-export-save-share-audio-file
  4. You will notice that options to Export or Save to a destination are not available. If you click on More to explore other options, you won’t find those available there either.
  5. Choose the Mail option which will launch the email software and the file will be shown as an attachment. Right click on the attachment and choose to save it.

Apple AirPods Not Showing up on Apple Mac Computer [SOLVED]

Using AirPods with your Mac

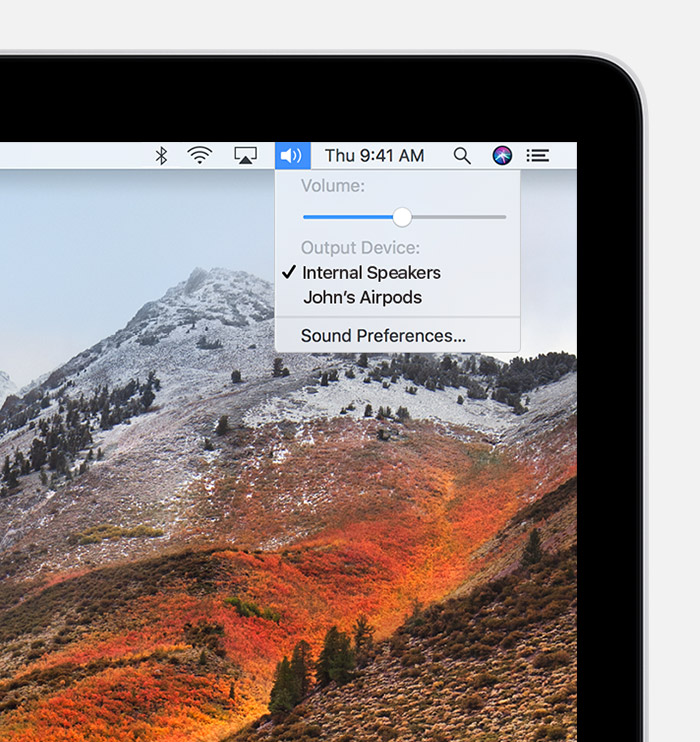
If you already set up your AirPods with your iPhone and your Mac is signed in to iCloud with the same Apple ID, they might be ready to use with your Mac. Place your AirPods in your ears and click the bluetooth icon in the menu bar on your Mac. Then choose AirPods from the list.

If you don’t see the AirPods listed as available in the bluetooth menu, you’ll need to pair the AirPods with your Mac following these steps:

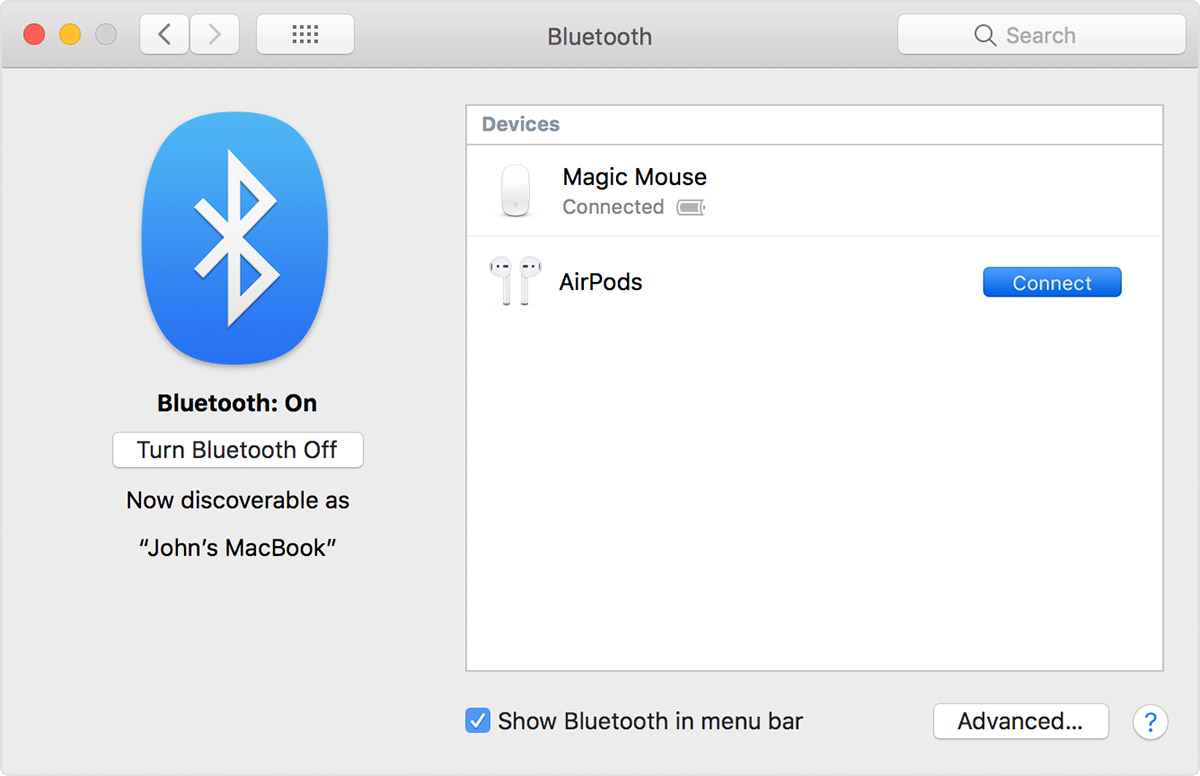
  1. On your Mac, choose System Preferences from the Apple () menu, then click Bluetooth.
  2. Make sure that Bluetooth is on.
  3. With your AirPods in the charging case, open the lid.
  4. Press and hold the setup button on the back of the case until the status light flashes white.
  5. The AirPods should now be listed.
  6. Select your AirPods in the Devices list, then click Connect.
  7. Test the AirPods to make sure they are working.

Use AirPods with a non-Apple device

You can use AirPods as a Bluetooth headset with a non-Apple device. You can’t use Siri, but you can listen and talk. To set up your AirPods with an Android phone or other non-Apple device follow these steps:

  1. On your non-Apple device, go to the settings for Bluetooth and make sure that Bluetooth is on. If you have an Android device, go to Settings > Connections > Bluetooth.
  2. With your AirPods in the charging case, open the lid.
  3. Press and hold the setup button on the back of the case until you see the status light flash white.
  4. When your AirPods appear in the list of Bluetooth devices, select them.

More

This document is a close replica of the Apple support document found here https://support.apple.com/en-us/HT208718. It is being offered here for our site followers to make it easier to find. Some wording above has been changed to make the document more readable.

Editing the Custom Dictionary on Apple Mac Computers

If you’ve ever mistakenly added a word to you custom dictionary using right click and Learn Spelling for a misspelled or unknown word, you will want to correct this in your custom dictionary.

Follow these steps to update your custom dictionary.

  1. Open your user Library folder. To do this, hold down the Option key and then from the Go menu in the Finder choose Library.
  2. Open the Spelling folder.
  3. Open the Text Edit program found in your Applications.
  4. Click and drag the LocalDictionary file (found in the Spelling folder) to the Text Edit icon in your Dock. This will open the file in the editor.
  5. From the File menu, choose Duplicate to create a backup copy of the file. Give it a name like LocalDictionary Backup.
  6. Make the desired changes to the main file (not the backup file).
  7. If you’re on a newer Mac, the LocalDictionary file will update automatically.

NTFS for Mac – Read Windows Hard Drive in Hibernation Mode

If you are using an Apple computer and need to read hard drives formatted as NTFS for Windows computers you will want NTFS for Mac by Paragon. While it’s usually possible to read NTFS formatted drives on an Apple Mac computer, it’s not possible to write to such drives.

If you’re using the NTFS for Mac software, you may occasionally plug in an NTFS drive and see a Recovery or System Reserved partition show up on the desktop, but the main Windows OS hard drive will not show up.

This happens when the Windows computer was not shut down properly, but instead turned ‘off’ by going into hibernate mode.

If you go into the NTFS for Mac software you will see the OS drive listed in the left column. When you select the drive, and attempt to manually mount the drive, a message will indicate that the drive can’t be mounted because it was shut down in hibernate mode.

You will need to choose the “Mount in Read-only mode” option and then try mounting again. This will allow you to read the drive.